Setting up WordPress on localhost means installing and running WordPress directly on your computer instead of a live web server. This approach is crucial in web development because it allows you to build, test, and modify websites safely without affecting a live environment.
Using a local server for WordPress installations offers key advantages:
- Offline access to your site anytime without needing an internet connection
- Faster iterations since changes happen instantly without uploading files remotely
- Safe testing grounds for experimenting with themes, plugins, or custom code
If you’re wondering how to set up WordPress on localhost, the process generally involves:
- Installing a local server environment (Apache, MySQL, PHP)
- Downloading and placing WordPress files in the local server directory
- Creating a MySQL database locally
- Running the WordPress installation wizard through a browser
This guide will walk you step-by-step through the WordPress localhost setup so you can master your local WordPress installation efficiently.
Understanding Localhost and Its Benefits
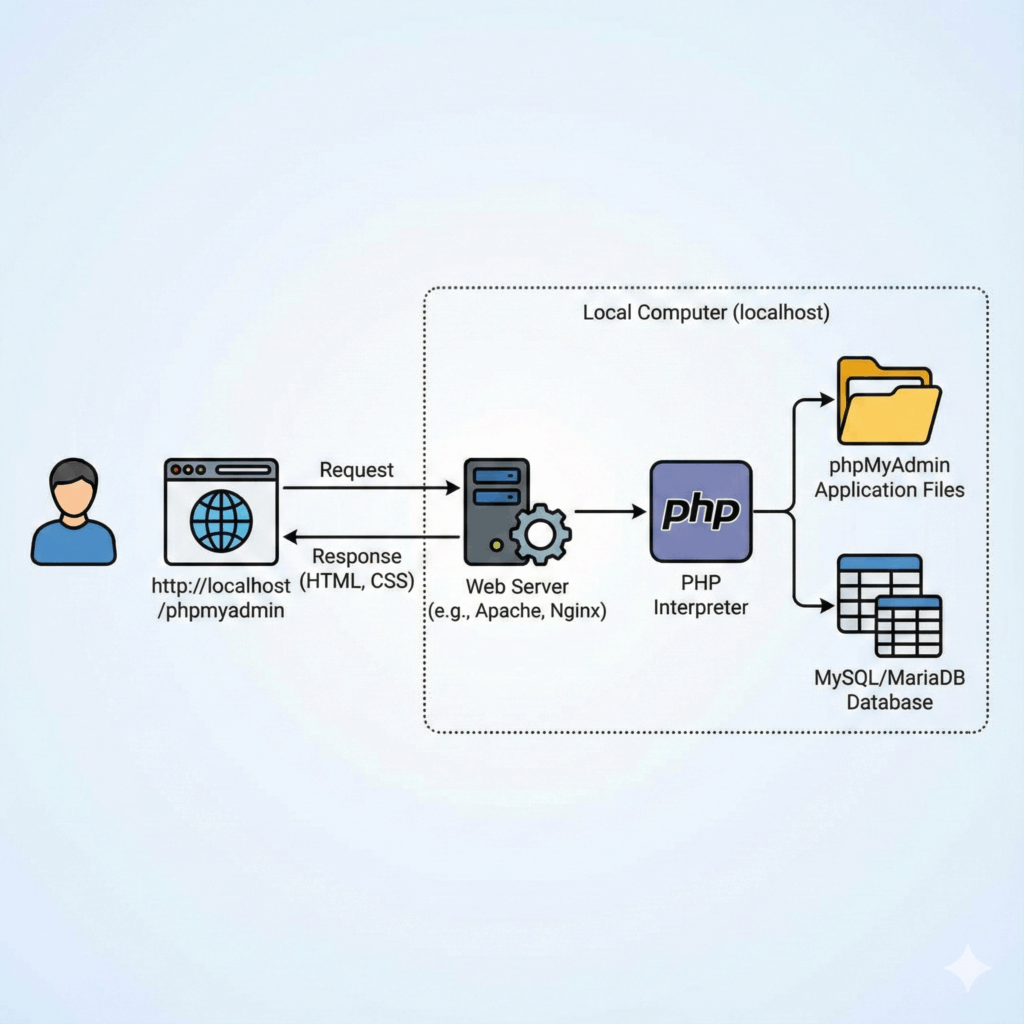
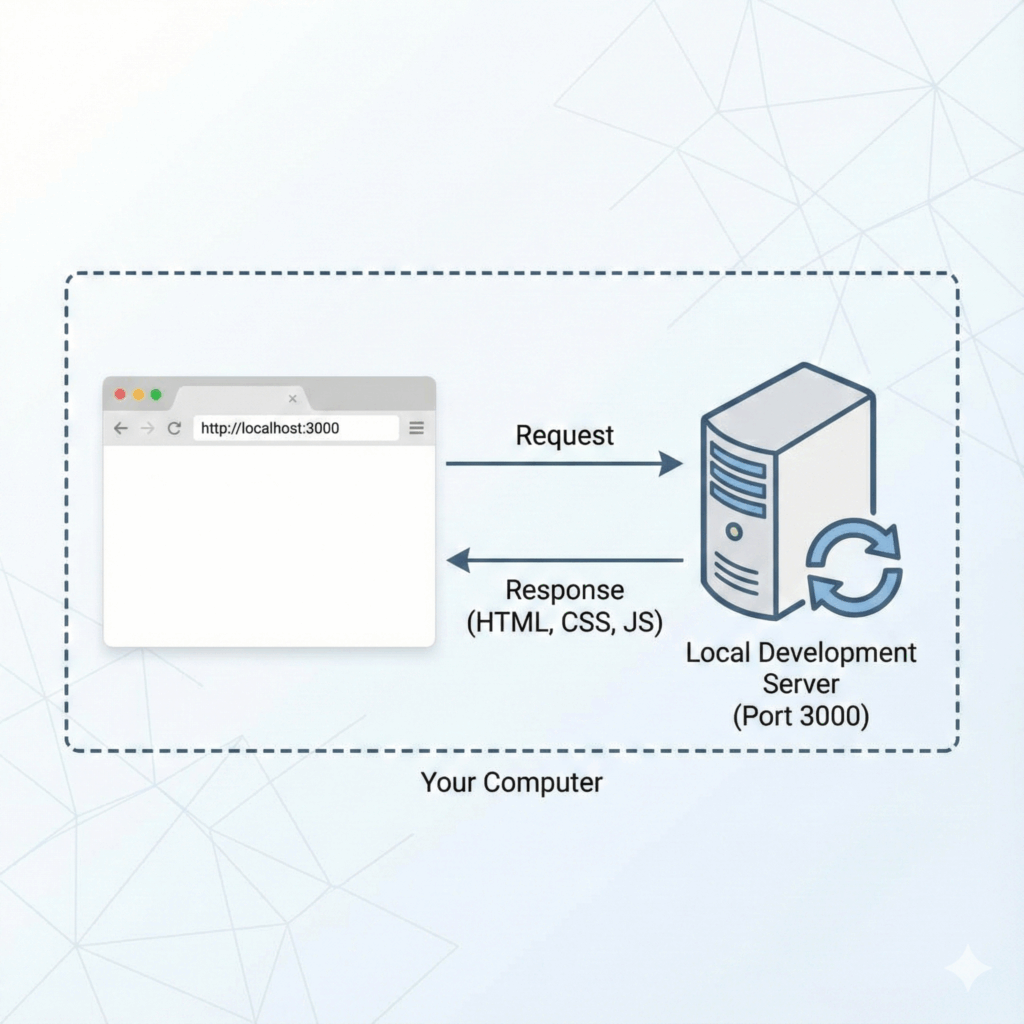
In web development, localhost refers to your own computer functioning as a web server. When you establish a local development environment, your computer mimics a live server, enabling you to operate websites and web applications without requiring internet access or an external host.
Developers prefer using localhost for WordPress projects because it offers several key advantages:
- Safe Testing: Making changes on localhost means your live website remains unaffected. You can experiment with themes, plugins, or custom code without risking downtime or errors visible to visitors.
- Quick Troubleshooting: Debugging is easier since you have full control over the environment. You can inspect files directly, restart services immediately, and view logs without delays.
- Offline Access: Work on your site anytime regardless of internet connectivity.
- Faster Iterations: Loading times are significantly reduced compared to remote servers, accelerating development cycles.
Using localhost creates a controlled space where you can build and refine WordPress sites efficiently before deploying them live.
Essential Components for Setting Up WordPress on Localhost
Setting up WordPress on your local machine requires a local server software that bundles three essential components: Apache, MySQL, and PHP. This combination is often referred to as the Apache MySQL PHP stack, or simply the AMP stack.
The Role of Each Component
These three parts must work together seamlessly to run WordPress locally:
- Apache Server: Acts as the web server software. It handles HTTP requests and delivers your WordPress site files to the browser.
- MySQL Database: Stores all your website’s content, user information, settings, and more in a structured database format.
- PHP Programming Language: Processes dynamic content. WordPress is built using PHP, so this component executes its scripts to generate web pages dynamically.
Popular Local Server Software Packages
Several popular local server software packages simplify this setup by bundling Apache, MySQL, and PHP into one easy installation:
- XAMPP: Cross-platform (Windows, MacOS, Linux), free and widely used. Provides an all-in-one solution with additional tools like phpMyAdmin for database management.
- WAMP: Designed specifically for Windows users. Includes Apache, MySQL, and PHP with a user-friendly control panel.
- MAMP: Tailored for MacOS but also available for Windows. Offers a straightforward setup and is optimized for Apple environments.
Choosing one depends on your operating system and personal preference. Each provides the necessary AMP stack to run WordPress smoothly on localhost.
Step-by-Step Guide to Installing a Local Server Environment
Setting up your local server environment begins by downloading XAMPP, one of the most popular and user-friendly packages for WordPress development. You can get it from the official Apache Friends website at https://www.apachefriends.org/index.html. Choose the version that matches your operating system—Windows, macOS, or Linux.
How to Install XAMPP on Your Computer
- Download the installer from the site.
- Run the installer file and follow the on-screen prompts.
- During installation, select components — make sure Apache, MySQL, and PHP are checked as they are essential.
- Choose an installation folder (default is usually fine, such as
C:\xamppon Windows). - Complete the setup and launch the XAMPP Control Panel.
Starting Apache and MySQL Modules
After installation:
- Open the XAMPP Control Panel.
- Click on Start next to Apache to activate the web server.
- Click on Start next to MySQL to start the database server.
Both services should display a green highlight indicating they are running. If ports are busy or blocked, you may need to adjust settings or stop conflicting programs like Skype or other web servers.
Once Apache and MySQL are active, your local server environment is ready for WordPress installation. This setup provides fast and offline access to your projects, allowing you to develop without interruptions from internet issues.
Downloading and Preparing WordPress for Local Installation
You need to download WordPress latest version directly from the official website to ensure you get the most secure and up-to-date files. Visit wordpress.org/download and click the button to download the ZIP package.
Once downloaded, locate the ZIP file on your computer. Extract the contents using a built-in extractor or a tool like WinRAR or 7-Zip. The extracted folder will contain all necessary WordPress files and folders.
Next, move these extracted files into your local server’s web directory. For XAMPP users, this directory is typically:
C:\xampp\htdocs\on Windows/Applications/XAMPP/htdocs/on macOS
Create a new folder inside htdocs — name it something relevant to your project, like mywebsite. Place all WordPress files inside this folder, not just the parent folder itself. This setup allows you to access your site at http://localhost/mywebsite in your browser for further installation steps.
Creating a MySQL Database for WordPress Locally
Setting up your localhost database involves using phpMyAdmin, a web-based interface bundled with most local server packages like XAMPP. This tool simplifies managing MySQL databases without command-line interaction.
To create a MySQL database via phpMyAdmin:
- Open your local server control panel (e.g., XAMPP Control Panel).
- Click the Admin button next to the MySQL module. This opens phpMyAdmin in your default browser.
- Inside phpMyAdmin, locate the Databases tab at the top and click it.
- In the Create database field, enter a descriptive name for your WordPress installation’s database—for example,
wordpress_local. - Choose
utf8mb4_general_cicollation from the dropdown to ensure proper character encoding support. - Click Create to set up the new database.
This newly created database is now ready to be linked during WordPress installation. You will reference this exact name when prompted for database details, alongside the default username (root) and typically no password for local setups.
Creating your MySQL database through phpMyAdmin keeps localhost management straightforward and accessible, especially for beginners handling WordPress development offline.
Running the WordPress Installation Wizard on Localhost
To run WordPress installer localhost, open your preferred web browser and enter the URL:
Replace foldername with the exact name of the folder where you placed your WordPress files inside the local server’s web directory (for example, htdocs/yourproject in XAMPP). This action launches the WordPress installation wizard.
You will be greeted with a welcome page asking you to select a language. Choose your preferred language and click Continue.
Next, WordPress will prompt you to enter your database connection details. Use these credentials:
- Database Name: The name of the database you created earlier in phpMyAdmin (e.g.,
wordpress_local). - Username: Typically, this is
rootfor local setups. - Password: Usually left blank on localhost unless you configured otherwise.
- Database Host: Leave as
localhost. - Table Prefix: Default is
wp_. Change this only if running multiple WordPress installations on one database.
Click Submit after filling in these fields. WordPress will check the connection to your database. If everything is correct, you’ll see a confirmation message allowing you to proceed.
The subsequent screen lets you set up your site details:
- Site Title
- Admin Username
- Password
- Your Email Address
Since this is a local environment, security constraints are minimal, but choose a strong admin password for practice. After clicking Install WordPress, the setup completes and offers a login link.
At this point, you have successfully installed WordPress locally and can start customizing or testing themes and plugins without impacting any live site.
Accessing and Managing Your Local WordPress Dashboard
After completing the WordPress installation on your localhost, the next step is to login to the WordPress dashboard localhost. Open your browser and navigate to:
http://localhost/foldername/wp-admin
Replace foldername with the name of the directory where you placed your WordPress files. You will see the login screen where you enter the admin username and password you set during installation.
Once logged in, the dashboard serves as the command center for your local WordPress site. Key features available include:
- Dashboard Home: Provides an overview of your site’s status, updates, and quick links.
- Posts and Pages: Create, edit, and manage your content locally without affecting a live website.
- Appearance: Customize themes, add new ones, or modify existing themes to test designs.
- Plugins: Install, activate, deactivate, or delete plugins to experiment with functionality.
- Settings: Configure site options like permalinks, reading settings, and user management.
Using these tools within the local environment allows you to develop and test changes confidently before moving to a live server.
Transferring Your Localhost WordPress Site to a Live Server
Once your WordPress site is fully developed on localhost, you may want to upload WordPress site from localhost to server to make it publicly accessible. This process involves:
- Exporting your local database.
- Uploading WordPress files via FTP or file manager.
- Importing the database on your live server.
- Updating configuration settings like
wp-config.phpand site URLs.
Tools like Duplicator or All-in-One WP Migration can simplify how to upload a WordPress site from localhost to server by automating much of this process. While detailed migration steps are beyond this article’s scope, knowing these basics prepares you for going live when ready.
Best Practices and Security Tips for Localhost Development
Maintaining a secure localhost environment WordPress requires attention to a few key practices:
- Keep your local server software like XAMPP, WAMP, or MAMP up-to-date. Updates often include critical security patches and performance improvements.
- Use strong, unique passwords for your local database and WordPress admin accounts, even if the site is not publicly accessible.
- Avoid using default usernames such as “admin” to reduce the risk of unauthorized access.
- Regularly back up your local WordPress files and databases to prevent data loss during development.
- Disable unnecessary services or ports on your machine to minimize vulnerabilities.
These steps ensure you not only learn How To Set Up Wordpress On Localhost effectively but also protect your development environment from potential threats.


