Bienvenidos a mi blog sobre uninstall apps, donde hoy vamos a explorar cómo deshabilitar Metro en Windows 8, un elemento que puede resultar molesto para muchos usuarios. Aprende a simplificar tu experiencia de usuario al máximo aquí.
Disabling Metro Interface in Windows 8: Streamlining Your Uninstall Apps Experience
In the context of uninstall apps, disabling the Metro Interface in Windows 8 can help streamline your experience. The Metro Interface, also known as the Modern UI, can sometimes be an obstacle when trying to uninstall apps quickly and efficiently.
The Metro Interface consists of a series of live tiles that represent apps and other content on your Windows device. While this design may be visually appealing, it may not always be ideal for users who prefer a more traditional desktop experience.
To disable the Metro Interface and make it easier to uninstall apps, you can follow these simple steps:
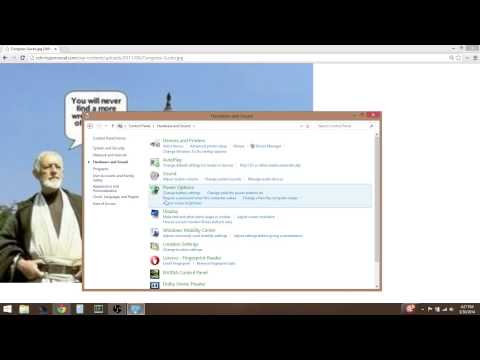
1. Right-click on the taskbar at the bottom of your screen and select “Properties.”
2. In the “Taskbar and Navigation properties” window, click on the “Navigation” tab.
3. Under the “Start screen” section, check the box next to “When I sign in or close all apps on a screen, go to the desktop instead of Start.”
4. Click “OK” to save your changes.
Once you complete these steps, your Windows 8 system will open directly to the desktop when you sign in, allowing you to bypass the Metro Interface. This makes it faster and more efficient to uninstall apps, as you can access the “Programs and Features” tool directly from the desktop environment.
In conclusion, disabling the Metro Interface in Windows 8 can significantly improve your uninstall apps experience by providing a more streamlined and user-friendly environment.
How to enable or disable Windows Defender in Windows 8

Windows 8 , 8.1 Disable touchpad gestures
How do I turn off Windows Metro?
Turning off Windows Metro in the context of uninstalling apps can be done by following these steps:
1. Right-click on the Taskbar and select Taskbar settings.
2. Scroll down to the section labeled Notification area and click on the link that says Select which icons appear on the taskbar.
3. Locate the entry for Windows Metro (also known as Live Tiles or Windows UI) and toggle the switch to Off. This will hide the Windows Metro icons from appearing on the taskbar.
4. To further disable Windows Metro, you can also right-click on any unused space on your desktop and select View and then uncheck the option for Show desktop icons. This will hide all desktop icons, including any Windows Metro shortcuts that may be present.
Please note that turning off Windows Metro does not uninstall any apps. To uninstall unwanted apps, follow these steps:
1. Open the Start menu by clicking on the Windows logo icon in the lower-left corner of your screen.
2. Locate the app you want to uninstall in the list of installed programs. Right-click on the app and select Uninstall from the context menu that appears.
3. Follow the on-screen prompts to complete the uninstallation process.
If you wish to remove all traces of the Metro UI completely, you may need to explore third-party solutions or opt to downgrade to a version of Windows that does not come pre-installed with the feature.
What is the metro screen in Windows 8?
The Metro screen in Windows 8 is the touch-optimized, tile-based interface that displays apps and other software installed on your computer. It is designed for both touchscreen devices and traditional PCs. In the context of uninstalling apps, users can directly uninstall apps from the Metro screen by right-clicking (or tapping and holding) on an app’s tile and selecting the Uninstall option.
How do I disable an app in Windows 8?
To disable an app in Windows 8, follow these steps:
1. Press the Windows key on your keyboard or click on the Start button in the bottom-left corner of the screen to bring up the Start menu.
2. In the Start menu, start typing “Control Panel” and click on it when it appears in the search results.
3. In the Control Panel, click on “Programs and Features.”
4. Find the app you want to disable in the list of installed programs. You can use the search box in the top-right corner to quickly find the app by typing its name.
5. Once you have found the app, click on it to select it, and then click the “Uninstall/Change” button at the top of the window.
6. Follow the on-screen prompts to complete the uninstallation process. This may involve confirming that you want to disable the app, as well as any additional steps required by the app’s specific uninstaller.
Please note that some apps may not provide an option to uninstall or disable them. In such cases, you may need to search for alternative methods specific to those apps or consult with the app developer for assistance.
How do I enable metered connection in Windows 8?
In the context of uninstalling apps, enabling a metered connection helps prevent unwanted automatic app updates and installations on your Windows 8 PC.
To enable the metered connection in Windows 8, follow these steps:
1. Press Windows key + C or move your cursor to the top right corner of the screen to open the Charms bar.
2. Click on the Settings charm, followed by selecting Change PC settings at the bottom of the panel.
3. In the PC Settings menu, select Network from the left pane, then click on Connections under the Network menu.
4. Locate your Wi-Fi connection in the list and click on it, which will open the related settings.
5. Underneath “Data usage,” click on the Set as metered connection option to turn it on.
Now, your connection is set as a metered one, and this will help you have better control over app installations and updates in Windows 8. Remember, you can always disable this setting by following the same steps and toggling off the metered connection option if needed.
How can I effectively disable Metro interface in Windows 8 while uninstalling unwanted apps?
To effectively disable the Metro interface in Windows 8 while uninstalling unwanted apps, follow these steps:
1. Press the Windows Key + X on your keyboard to open the Power User menu.
2. Select ‘System’ from the list of options, and a new window will open with system properties.
3. In the System Properties, click on the ‘Advanced system settings’ link, located on the left side of the window.
4. Navigate to the ‘Performance’ section in the Advanced tab and click on the ‘Settings’ button.
5. In the Performance Options window, switch to the ‘Custom’ radio button, and uncheck the box for the ‘Enable Aero Peek’ option.
6. Next, uncheck the box for the ‘Animate controls and elements inside windows’ option.
7. Click ‘Apply’ and then ‘OK’ to save the changes.
Now, to uninstall unwanted apps:
1. Right-click on the app you want to uninstall from the Start screen.
2. Select the ‘Uninstall’ option from the context menu that appears.
3. A confirmation message will appear; click ‘Uninstall’ again to proceed with the removal process.
4. The app will then be uninstalled from your system.
By following these steps, you have successfully disabled the Metro interface in Windows 8 and uninstalled unwanted apps.
What are the top methods to prevent Metro UI from launching when removing applications in Windows 8?
In the context of uninstalling apps, preventing Metro UI from launching when removing applications in Windows 8 can be achieved using the following top methods:
1. Boot directly to desktop: Configure Windows 8 to bypass the Metro UI Start Screen and boot directly to the desktop. This can be done by creating a scheduled task that runs the “explorer.exe” command at startup.
2. Disable the hot corners: To prevent accidentally launching the Metro UI when navigating your desktop, disable the hot corners feature. This can be done using third-party tools such as Classic Shell or by modifying the registry.
3. Use a third-party start menu replacement: Apps like Classic Shell or Start8 allow you to replace the default Metro UI Start Screen with a traditional Start Menu, providing better control over the app removal process.
4. Uninstall using Control Panel or Settings App: To remove applications without entering the Metro UI, use the Control Panel or the Windows Settings App, which can be accessed from the desktop.
5. Create shortcuts for commonly used programs: By creating shortcuts on your desktop or taskbar for commonly used applications, you can minimize the need to access the Metro UI Start Screen.
By implementing these methods, you can effectively prevent the Metro UI from launching when removing applications in Windows 8.
Which tools or techniques can be used to disable Metro on Windows 8 in the process of uninstalling unnecessary apps?
To disable Metro on Windows 8 and uninstall unnecessary apps, you can use the following tools and techniques:
1. Classic Shell: This is a free software that allows you to replace the Metro interface with a more traditional Start menu. By doing so, you can efficiently manage and uninstall apps using the new Start menu.
2. Task Scheduler: You can use the built-in Task Scheduler in Windows 8 to disable specific Metro apps from running. To do this, open the Task Scheduler, go to the “Task Scheduler Library,” create a new task, and enter the app’s information. Set the trigger to “At log on” and the action to “Stop.”
3. Group Policy Editor: If you’re using Windows 8 Pro or Enterprise, you can use the Group Policy Editor to disable specific Metro apps. Open the Group Policy Editor by typing “gpedit.msc” in the Run dialog box, navigate to “User ConfigurationAdministrative TemplatesStart Menu and Taskbar,” and then set the policy “Do not allow pinning Store app to the Taskbar” to “Enabled.”
4. Windows PowerShell: You can use PowerShell to uninstall pre-installed Metro apps. Open PowerShell as an administrator and type the following command to view all installed apps:
“`
Get-AppxPackage -AllUsers
“`
Identify the app you want to uninstall, then type the following command to remove it:
“`
Remove-AppxPackage [PackageFullName]
“`
5. Third-party uninstallers: There are various third-party uninstaller programs available that can help you disable Metro apps, such as IObit Uninstaller, Revo Uninstaller, and Geek Uninstaller.
Remember to always create a system restore point before making significant changes to your system settings or uninstalling apps, in case you need to revert your system back to its previous state.