
How to Uninstall VPN on iPhone: A Comprehensive Guide for Expert Users
Your iPhone has become an indispensable asset in your life, providing access to a treasure trove of information and resources at the tips of your fingers. The reliance on mobile devices has also brought forth concerns about privacy and security. To protect your personal data, you may have opted to use a Virtual Private Network (VPN). VPNs enhance security by creating encrypted tunnels for data transmission, keeping your online activities secure and private.
However, there might come a time when you no longer need the VPN service on your iPhone or wish to switch to another service provider. In such cases, uninstalling the VPN app on your device becomes essential. In this informative article, we shall explore how to uninstall VPN on iPhone and address related concerns from both technical and non-technical perspectives using expert software engineering knowledge.
*Table of Contents*
1. Locating the VPN App: Find and Uninstall
2. Uninstalling VPN Profiles and Certificates
3. Uninstalling Enterprise VPN Apps
4. Common Issues and Troubleshooting Tips
5. Securing Your iPhone Post VPN Uninstallation
1. Locating the VPN App: Find and Uninstall
Most VPNs come with dedicated apps that can be easily uninstalled from your iPhone. The primary step in uninstalling any app, including a VPN app, on your iPhone involves locating the app icon within the device. Once you have found the app icon, follow these steps for seamless uninstallation:
1. Long press on the VPN app’s icon until a context menu appears with options like Remove App.
2. Tap on Remove App.
3. Confirm the action by tapping Delete App when prompted.
It is crucial to note that this process will delete all app-related data on your device. Thus, ensure that you have exported or secured any necessary information before proceeding.
2. Uninstalling VPN Profiles and Certificates
If you have set up a VPN connection manually or through different configurations, you will need to remove the associated VPN profiles and certificates on your iPhone. To accomplish this, follow these steps:
1. Open the Settings app on your iPhone.
2. Navigate to General > VPN.
3. Under the VPN section, you will find the list of installed VPN profiles. Tap on the ⓘ icon next to the VPN profile you wish to remove.
4. Select Delete VPN or Remove Profile, depending on your iOS version.
5. Confirm the action when prompted.
For removing VPN certificates, navigate to Settings > General > Profile, locate the certificate connected to the VPN, tap on it, and select Remove Profile.
3. Uninstalling Enterprise VPN Apps
In some cases, you might be using an enterprise VPN app provided by your organization. These apps can be more complex than traditional VPN apps and may require additional steps for uninstallation. If so, consult your IT administrator or refer to the company’s documentation for specific instructions.
4. Common Issues and Troubleshooting Tips
During the process of uninstalling a VPN on your iPhone, you may encounter certain issues. Here are some common problems and their solutions:
1. *VPN continues to function even after app removal*: In such cases, check if there are any VPN profiles still present on your device. Follow the steps listed in Section 2 to remove them.
2. *VPN app icon not visible on the home screen*: Use the Spotlight search feature by swiping down on the home screen and typing the app’s name to locate it. If it still does not appear, check if the app is hidden within a folder or consult Apple’s support documentation.
3. *Unable to delete VPN profiles or certificates*: Ensure that you have the necessary administrator privileges on your device to remove these profiles or certificates. If the issue persists, consult your IT administrator or Apple’s support team.
5. Securing Your iPhone Post VPN Uninstallation
After successfully uninstalling a VPN on your iPhone, it is essential to consider alternate privacy and security measures to protect your data. Some recommendations include using secure Wi-Fi networks, enabling two-factor authentication, regularly updating your device software, and employing alternative privacy tools such as encrypted messaging apps.
In conclusion, this article has provided a comprehensive guide on how to uninstall VPN on iPhone, along with tips for ensuring security post-uninstallation. By following the steps outlined in this article, you can effortlessly uninstall VPNs without compromising your iPhone’s privacy and security.
iPhone 11 Pro: How to Add a VPN Connection
How to turn off VPN in iPad,iphone?Wifi not working (Solved)

How do I completely remove VPN?
To completely remove a VPN from your device, follow these steps:
Step 1: Uninstall the VPN app
– On Windows:
1. Click the Start button and search for Control Panel.
2. Open the Control Panel and click on Programs and Features.
3. Locate the VPN app in the list, click on it, and select Uninstall. Follow the prompts to complete the process.
– On macOS:
1. Open the Applications folder in Finder.
2. Locate the VPN app, click and hold on its icon, and drag it to the Trash.
3. Right-click the Trash icon and select Empty Trash to permanently delete the app.
– On Android:
1. Open the Settings app and tap on Apps & notifications.
2. Find the VPN app in the list and tap on it.
3. Tap on Uninstall to remove the app from your device.
– On iOS:
1. Locate the VPN app on your home screen.
2. Press and hold on the app icon until it starts jiggling.
3. Tap on the X icon that appears on the top-left corner of the app.
4. Select Delete to confirm, and the app will be removed from your device.
Step 2: Remove VPN settings and profiles
If you have manually configured VPN settings or installed VPN profiles, make sure to delete them as well.
– On Windows:
1. Click the Start button and search for Settings.
2. Open Settings and click on Network & Internet.
3. Click on VPN, locate the VPN profile you want to remove, and click the Remove button.
– On macOS:
1. Click on the Apple icon in the top-left corner and select System Preferences.
2. Click on Network, and then select the VPN connection from the list on the left.
3. Click the – (minus) button at the bottom of the list to remove the VPN connection.
– On Android:
1. Open the Settings app and tap on Network & internet‘.
2. Tap on VPN and locate the VPN profile you want to delete.
3. Tap on the gear icon beside the profile, and then tap on Forget VPN.
– On iOS:
1. Open the Settings app and tap on General.
2. Scroll down to VPN and tap on it.
3. Tap on the i icon next to the VPN profile you want to delete.
4. Tap on Delete VPN to remove the profile.
By completing these steps, you will have successfully removed the VPN app and any associated settings or profiles from your device.
What happens when you delete VPN on iPhone?
When you delete a VPN on your iPhone, several things happen:
1. VPN settings and configuration: All the VPN settings and configuration will be removed from your device. This means your iPhone will no longer connect to the VPN server, and any saved login credentials will be erased.
2. VPN app: The VPN app will be uninstalled from your iPhone, freeing up storage space in the process.
3. Privacy and security: Deleting the VPN removes the additional layer of privacy and security that it provided while browsing the internet or using apps that access the internet.
4. Access to geo-restricted content: If you used the VPN to access content restricted to certain regions or countries, you will no longer have access to such content after deleting the VPN.
5. Internet speed: Your internet speed might change after uninstalling the VPN, as some VPNs slow down your connection. On the other hand, if the VPN was improving your connection speeds (e.g., by bypassing ISP throttling), your internet speed may decrease without the VPN.
Remember, if you want to use a VPN again in the future, you can always reinstall the app and reconfigure the settings.
Why does my iPhone keep showing VPN?
Your iPhone may keep showing VPN because you have a VPN app installed on your device that is constantly running or trying to connect. To stop the VPN from showing up, you can either turn off the VPN connection or uninstall the VPN app.
Uninstalling the VPN app is a simple solution if you don’t want to use a VPN on your iPhone anymore. Here’s how to uninstall a VPN app from your iPhone:
1. Locate the VPN app icon on your home screen.
2. Press and hold the VPN app icon until a menu appears.
3. Tap on “Remove App” or “Delete App” (depending on your iOS version).
4. Confirm the action by selecting “Delete” or “Remove” to uninstall the app.
Keep in mind that if you still want to use a VPN without the constant notifications, you can also manage the VPN settings within the app itself. Most of the VPN apps allow users to switch off automatic connection or disable the notification banners.
However, if you’ve uninstalled the VPN app but still see VPN-related notifications, it’s possible that there is another app or profile installed on your iPhone that is causing these notifications. In this case, you should review your installed apps and profiles to find and remove the cause of these VPN notifications.
Should I turn VPN off on iPhone?
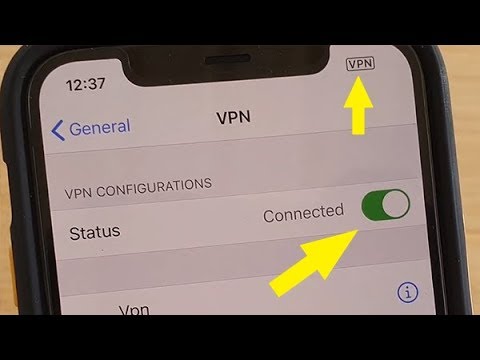
Yes, it is recommended to turn off your VPN on your iPhone when you’re trying to uninstall apps. This is because some VPN services may interfere with the app uninstallation process or cause unexpected issues during the removal of certain apps. To ensure a smooth and successful uninstallation, make sure to disable your VPN temporarily by following these steps:
1. Open the Settings app on your iPhone.
2. Scroll down and tap on VPN.
3. If your VPN is currently connected, you’ll see a green Status indicator. Tap on the Status slider to turn off the VPN connection.
4. Once the connection is off, proceed with uninstalling the desired apps.
Remember to turn your VPN back on after you have finished uninstalling the apps to maintain secure browsing and online privacy.
What are the step-by-step instructions for uninstalling a VPN app from an iPhone?
Uninstalling a VPN app from your iPhone can be done quickly and easily by following these step-by-step instructions:
1. Locate the VPN app on your iPhone’s home screen.
2. Press and hold the VPN app icon until a menu appears.
3. In the menu, select Remove App or, if you have an older iPhone, wait for the icons to start wiggling and tap on the X in the top left corner of the app icon.
4. A confirmation pop-up will appear asking if you want to delete the app. Tap on Delete or Delete App to confirm the uninstallation. This will remove the VPN app from your iPhone.
5. If you’re using an older iPhone, press the Home button or tap “Done” in the top right corner of your screen to stop the icons from wiggling.
Note: Uninstalling the VPN app will also remove any VPN configurations associated with that app. If you want to use a VPN again in the future, you will need to download and set up a new VPN app or manually configure a VPN connection in the Settings app.
Are there any special considerations or settings to be aware of when removing a VPN app from iOS devices?
When removing a VPN app from iOS devices, there are some special considerations and settings to be aware of. It is essential to ensure a smooth and complete uninstall process, preventing any leftover settings or files that could cause issues later on.
1. Turn off VPN connection: Before starting the uninstallation process, make sure to disconnect the VPN by turning off the VPN connection in your device’s settings or within the VPN app itself.
2. Remove VPN configurations: Some VPN apps create a VPN profile in the device’s settings. To remove this profile, navigate to Settings > General > VPN, and select the VPN configuration associated with the app. Then, click the “i” button next to the profile and choose “Delete VPN.”
3. Delete the VPN app: To remove the app from your device, tap and hold on the app icon until it starts shaking. Then, tap on the “x” that appears on the app icon and confirm the deletion.
4. Check for residual files: Although rare, some VPN apps may leave behind residual files or settings after they have been uninstalled. To ensure that there are no lingering remnants of the app, you may perform a restart on your iOS device.
5. Optional: Reset network settings: If you encounter any network-related issues, such as slow internet speeds or connection problems, after uninstalling the VPN app, consider resetting your network settings. This can be done by navigating to Settings > General > Reset > Reset Network Settings. Note that this will also remove all Wi-Fi networks and passwords, cellular settings, and VPN profiles.
By following these steps and special considerations, you can safely and effectively remove a VPN app from your iOS device while ensuring that no unwanted files or settings remain on your device.
How can I ensure that all traces of a VPN app have been completely removed after uninstalling it from my iPhone?
To ensure that all traces of a VPN app have been completely removed after uninstalling it from your iPhone, follow these steps:
1. Uninstall the VPN app: Tap and hold the VPN app icon on your home screen until it starts to wiggle. Then, tap the ‘X’ button on the top-left corner of the app icon to uninstall it.
2. Remove VPN profiles: Go to Settings > General > VPN. If you see any VPN configurations related to the uninstalled VPN app, tap on the ⓘ icon next to the profile, and then tap ‘Delete VPN’.
3. Clear Safari cache and history: To remove any browsing data tied to the VPN app, go to Settings > Safari > Clear History and Website Data.
4. Reboot your iPhone: Restart your iPhone by holding down the power button, then sliding the “slide to power off” option to turn off the device. Turn it back on by pressing the power button again. This helps clear any residual data left in the system memory.
5. Check for leftover files: Some VPN apps may store data in other locations on your iPhone. You can use an iOS file management app like Files or Documents by Readdle to look for any remnants of the VPN app. Keep in mind that this step is recommended for advanced users only, as deleting essential system files may damage your iPhone’s functionality.
By following these steps, you should be able to remove all traces of the VPN app from your iPhone.