Title: 5 Comprehensive Steps to Uninstall AutoCAD on Windows 10
The AutoCAD software suite has become an essential tool for engineers, architects, and designers worldwide. Its countless features and capabilities make it a staple in the industry. However, as with any software, there may come a time when you need to uninstall AutoCAD from your Windows 10 computer. Perhaps you are switching to a different software, upgrading to a newer version of AutoCAD, or troubleshooting some issues. But a simple uninstall may not be enough; you want to ensure that it is completely removed from your system.
As an expert software engineer, I understand that completely uninstalling software can be a challenging task, especially if the software is as comprehensive as AutoCAD. In this technical article, I will guide you through five comprehensive steps that will teach you how to completely uninstall AutoCAD Windows 10. By following these steps, you can ensure that no traces or files related to AutoCAD remain on your system. So, let’s dive into the world of software un-installation and learn the most effective ways to remove AutoCAD from your computer.
Step 1: Perform a Standard Uninstall of AutoCAD
Before diving into more advanced techniques, always start with the standard uninstall process. Follow these steps to initiate the standard uninstallation of AutoCAD:
1. Press Windows + X keys, then click on Apps and Features.
2. Locate AutoCAD in the list of installed applications.
3. Click on AutoCAD, then select Uninstall.
4. Follow the prompts to complete the uninstall process.
However, even though you have completed the standard uninstall, there may still be residual files and registry entries that could cause issues in the future. To ensure a complete removal, continue with the following steps.
Step 2: Delete AutoCAD-related Folders
AutoCAD creates several folders during its installation, which store various settings and files. After completing the standard uninstall process, you need to manually delete these folders to remove all traces of AutoCAD from your system.
Search for the following folder locations on your computer and delete the corresponding folders:
1. *C:Program FilesAutodesk*
2. *C:Program FilesCommon FilesAutodesk Shared*
3. *C:ProgramDataAutodesk*
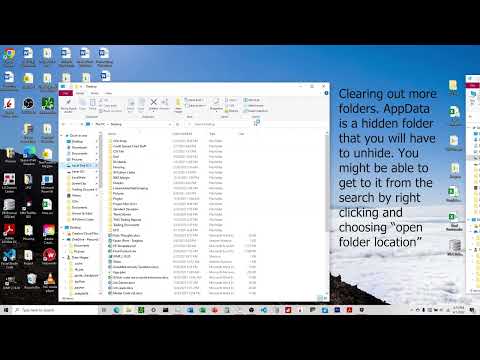
4. *C:Users%username%AppDataRoamingAutodesk*
*(%username% should be replaced with your actual username)*
Keep in mind that these folder locations may vary depending on the version of AutoCAD you have installed.
Step 3: Clean the Windows Registry
The Windows Registry stores configuration data about every program installed on your computer. When you uninstall a program, some registry entries may be left behind, causing potential issues or conflicts in the future. To clean the Windows Registry, follow these steps:
1. Press Windows + R keys, then type regedit and press Enter.
2. In the Registry Editor, press Ctrl + F and search for AutoCAD.
3. Delete any keys or values related to AutoCAD.
4. Repeat the search until no more AutoCAD-related entries are found, then close the Registry Editor.
Warning: Be extremely cautious when working with the Windows Registry, as deleting the wrong key could lead to system instability or even failure. It is highly recommended that you create a backup of your registry before proceeding with this step.
Step 4: Use a Dedicated Uninstaller Software
There are third-party uninstaller software programs available, such as Revo Uninstaller and IObit Uninstaller, that can help you completely remove AutoCAD from your system. These tools can scan your computer for any remaining files, folders, and registry entries associated with AutoCAD, allowing you to delete them efficiently.
Follow the instructions provided by your chosen uninstaller software to remove any remaining traces of AutoCAD. Remember to always download and install these tools from reputable sources to ensure your computer’s safety.
Step 5: Restart Your Computer
After completing all the steps mentioned above, it is essential to restart your computer to finalize the uninstall process. This ensures that any lingering changes are applied, and your system is entirely free from AutoCAD components.
By following these five comprehensive steps, you can successfully uninstall AutoCAD on Windows 10 and ensure that your system is clean and ready for your next software installation or upgrade. Do not hesitate to return to this technical article if you need to uninstall AutoCAD in the future, as these steps can be universally applied to different versions of the software suite.
How to Completely Uninstall AnyDesk From Windows 10
Clean reinstall of Autodesk software on Windows

How do I completely uninstall AutoCAD?
To completely uninstall AutoCAD from your computer, follow these steps:
1. Close any running instances of AutoCAD: Before starting the uninstallation process, make sure that all instances of AutoCAD are closed. This includes any processes running in the background.
2. Go to Control Panel: Click on the Start button or press the Windows key, type “Control Panel” (without the quotes) in the search box, and press Enter.
3. Navigate to Programs and Features: In the Control Panel window, click on “Programs and Features” or “Uninstall a program” (depending on the view you have set).
4. Find AutoCAD in the list: In the list of installed programs, look for AutoCAD, Autodesk AutoCAD, or a similar name. The AutoCAD version should also be mentioned in the name (e.g., AutoCAD 2020).
5. Uninstall AutoCAD: Select the AutoCAD entry in the list, and then click on the “Uninstall” button or right-click on the entry and choose “Uninstall” from the context menu. Follow the on-screen instructions to completely remove AutoCAD from your system.
6. Delete leftover files and folders: Once the uninstallation is complete, you may want to manually delete any remaining files associated with AutoCAD. Navigate to the installation directory (usually “C:Program FilesAutodesk” or “C:Program Files (x86)Autodesk”) and delete the AutoCAD folder. Additionally, check “C:UsersAppDataRoamingAutodesk” and “C:UsersAppDataLocalAutodesk” for any AutoCAD-related folders and delete them.
7. Clean the Windows Registry: To remove any leftover registry entries related to AutoCAD, you can use a third-party tool like CCleaner or manually edit the registry (only recommended for advanced users). Always backup your registry before making any changes.
8. Restart your computer: Finally, reboot your system to ensure that all changes take effect and AutoCAD is completely uninstalled from your computer.
Note: If you have multiple versions of AutoCAD installed on your computer, you’ll need to repeat these steps for each version you want to uninstall.
How do I completely remove AutoCAD from registry?
How to Completely Remove AutoCAD from Registry
To completely remove AutoCAD from your system, you need to uninstall the software and then manually delete its traces in the registry. This can be a lengthy process, but it ensures that the application is entirely removed. Here are the steps to uninstall AutoCAD and delete its registry entries:
Step 1: Uninstall AutoCAD from your PC
1. Press Windows + X keyboard shortcut and select Apps and Features.
2. Scroll down the list of applications to locate AutoCAD.
3. Click on AutoCAD, then click on Uninstall and follow the onscreen prompts to remove the program.
Step 2: Backup your registry (Optional but recommended)
Before editing your registry, it is advisable to create a backup in case any issues arise during the process. To do this:
1. Press the Windows + R keyboard shortcut, type regedit, and press Enter.
2. In the Registry Editor window, click File > Export.
3. Choose a location and filename for the backup, then click Save.
Step 3: Remove AutoCAD registry entries
1. Press Windows + R“, type regedit, and press Enter to open the Registry Editor.
2. Manually navigate to the following paths and delete the appropriate folders containing AutoCAD references:
– HKEY_CURRENT_USERSoftwareAutodesk
– HKEY_LOCAL_MACHINESOFTWAREAutodesk
3. Press Ctrl + F to open the search box within Registry Editor.
4. Type AutoCAD and click on Find Next.
5. After the search locates an AutoCAD-related key, right-click on it and choose Delete.
6. Repeat steps 4 and 5 until no more AutoCAD-related keys are found in the registry.
Note: Be cautious when deleting registry keys, as removing critical system keys can lead to instability or non-functioning of your PC.
After completing these steps, AutoCAD should be entirely removed from your system, including its registry entries. Remember to restart your computer to apply these changes.
How do I uninstall AutoCAD from Windows 10?
If you need to uninstall AutoCAD from your Windows 10 computer, follow these easy steps:
1. Press the Windows key on your keyboard or click on the Start button in the lower left corner of your screen. Then, type ‘Control Panel’ and press Enter.
2. In the Control Panel, click on Programs and Features (also known as Add or Remove Programs in some versions of Windows).
3. Now, look for AutoCAD in the list of installed programs. You can use the Search box in the upper right corner if you have trouble finding it.
4. Once you’ve found AutoCAD, click on it to select it. Then, click on the Uninstall button (above the list of programs).
5. A new window will open, prompting you to confirm that you want to uninstall AutoCAD. Click on Yes.
6. The AutoCAD Uninstall Wizard will now start. Follow the on-screen instructions to complete the uninstallation process.
7. After the uninstallation is complete, you may need to restart your computer.
By following these steps, you can successfully uninstall AutoCAD from your Windows 10 system. Remember to back up any important files or projects before uninstalling the software, as you may lose them during the process.
Why my AutoCAD is not uninstalling?
There could be several reasons why your AutoCAD is not uninstalling properly. Here are some possible causes and solutions to help you successfully uninstall AutoCAD:
1. Corrupted Installation Files: If the installation files are corrupted or damaged, the uninstallation process might not work correctly. To fix this issue, try reinstalling AutoCAD to overwrite the damaged files and then attempt to uninstall it again.
2. Insufficient User Privileges: You may not have the necessary administrative rights to uninstall the software. Ensure that you are logged in as an administrator or have the appropriate permissions to uninstall the program.
3. Uninstall Tool Conflict: Some third-party uninstall tools can cause conflicts with the AutoCAD uninstaller. If you’re using such a tool, try uninstalling AutoCAD directly from the Control Panel or use the Autodesk Uninstall Tool instead.
4. Missing Uninstaller File: The AutoCAD uninstaller file might be missing, preventing the software from being uninstalled. In this case, download the Autodesk Uninstall Tool, which should help remove any remaining traces of the program.
5. Interference from Other Software: Antivirus programs or other software could be interfering with the uninstallation process. Temporarily disable any security software and close all unnecessary applications before attempting to uninstall AutoCAD.
If none of these solutions work, you can try reaching out to Autodesk Support for further assistance in resolving the issue.
How can I thoroughly remove all traces of AutoCAD from my Windows 10 system after uninstalling the app?
To thoroughly remove all traces of AutoCAD from your Windows 10 system after uninstalling the app, follow these steps:
1. Uninstall AutoCAD using the Programs and Features menu in the Control Panel. To do this, search for “Control Panel” in the Start menu, open it, and then navigate to “Programs” > “Programs and Features”. Find AutoCAD in the list, click on it, and then click “Uninstall”.
2. Delete remaining files and folders. After uninstalling, some files and folders may still be left behind. Navigate to the following locations and delete any remaining AutoCAD-related files and folders:
– C:Program FilesAutodesk
– C:Program Files (x86)Autodesk
– C:UsersAppDataRoamingAutodesk
– C:UsersAppDataLocalAutodesk
Replace ” with your actual Windows username.
3. Clean the Windows Registry. The Windows Registry might also contain leftover entries related to AutoCAD. You can use a third-party registry cleaner like CCleaner or manually clean the registry using the built-in “regedit” tool.
Important: Editing the registry can be risky, so make sure you create a backup of your registry before making any changes. To manually clean the registry, follow these steps:
– Press `Win + R` to open the Run dialog box, type “regedit”, and then press Enter.
– Press `Ctrl + F` to open the Find dialog box, and then type “AutoCAD” or “Autodesk” in the search field.
– Delete any associated keys or values that are found.
– Repeat the search and deletion process until no more results are found.
4. Restart your computer to ensure all changes have taken effect and AutoCAD is completely removed from your system.
By following these steps, you will have thoroughly removed all traces of AutoCAD from your Windows 10 system.
What are the most effective ways to ensure a complete uninstallation of AutoCAD on Windows 10?
To ensure a complete uninstallation of AutoCAD on Windows 10, follow these most effective ways:
1. Use the AutoCAD Uninstall Tool: Autodesk provides an uninstall tool that helps in removing its software, including AutoCAD, comprehensively. To access this tool, go to the Windows Start menu > All Apps > Autodesk > Uninstall Tool.
2. Uninstall AutoCAD via Control Panel: Go to the Control Panel > Programs and Features, find AutoCAD on the list, right-click, and select Uninstall. Follow the on-screen instructions to complete the process.
3. Delete AutoCAD residual files and folders: Navigate to the installation directory (usually C:Program FilesAutodesk) and delete any remaining AutoCAD-related folders.
4. Clean the Windows Registry: Press Windows key + R, type “regedit” and hit Enter. In the Registry Editor, search for all entries related to AutoCAD and delete them. Be cautious while editing the registry, as mistakes could harm your system.
5. Remove related user files: Press Windows key + R, type “%appdata%” and hit Enter. Delete any AutoCAD folders in the AppDataRoaming directory. Repeat this step for the AppDataLocal directory.
6. Reboot your computer: Restarting your computer ensures that all changes are applied and any leftover files are removed.
By following these steps meticulously, you can make sure that AutoCAD is completely uninstalled from your Windows 10 system.
Are there any third-party uninstaller tools recommended for fully removing AutoCAD from a Windows 10 computer?
Yes, there are several third-party uninstaller tools recommended for fully removing AutoCAD from a Windows 10 computer. These tools ensure that all the files, registry entries, and folders associated with the application are removed completely. Some of the most popular third-party uninstaller tools include:
1. Revo Uninstaller: Revo Uninstaller is a powerful tool that offers advanced scanning algorithms to ensure thorough removal of applications like AutoCAD. It also has a user-friendly interface and can manage startup programs and clean your browsing history.
2. IObit Uninstaller: IObit Uninstaller is another reliable choice for fully uninstalling AutoCAD. This tool detects and removes leftover files, including those in the registry, ensuring a complete cleanup. It also offers batch uninstallation and an easy-to-navigate interface.
3. Wise Program Uninstaller: Wise Program Uninstaller is a simple yet effective tool for removing AutoCAD and its leftovers. It uses a “safe uninstall” feature, which performs a standard uninstall, followed by a deep scanning process to ensure that no residual files are left behind.
Remember to always create a system restore point or backup before using any third-party uninstaller tools to avoid any potential issues.