¡Hola a todos! Bienvenidos al blog, donde hoy hablaremos sobre cómo deshabilitar permanentemente la aplicación de firma de controladores en Windows 11. Aprenderemos cómo garantizar que nuestros dispositivos funcionen sin interrupciones en el nuevo sistema operativo. ¡Vamos a empezar!
Permanently Disabling Driver Signature Enforcement in Windows 11: Enhancing Uninstall Apps Experience
Permanently disabling Driver Signature Enforcement in Windows 11 can enhance the uninstall apps experience for users. Driver Signature Enforcement is a security feature that requires all drivers to have a valid signature before they can be installed on the system. This ensures the integrity of the drivers and prevents malicious software from being installed.
However, some users may need to uninstall certain apps or drivers that do not have a proper signature. In such cases, disabling Driver Signature Enforcement can provide an improved experience when using uninstall apps utilities.
To permanently disable Driver Signature Enforcement in Windows 11, follow these steps:
1. Press the Windows key + X and click on Windows Terminal (Admin) to open an elevated command prompt.
2. Type the following command and press Enter: bcdedit /set nointegritychecks on
3. Restart your computer for the changes to take effect.
After completing these steps, the Driver Signature Enforcement will be permanently disabled, allowing you to easily uninstall unsigned apps and drivers using your preferred uninstall apps tool.
Keep in mind that disabling this security feature might expose your system to potential risks, as it allows the installation of potentially harmful or incompatible drivers. It is essential to understand the implications of this action and proceed with caution.
In conclusion, permanently disabling Driver Signature Enforcement in Windows 11 can improve the uninstall apps experience for users who need to remove unsigned apps or drivers. However, this should be done with caution due to the potential security risks involved.
CARA TERMUDAH DISABLE DRIVER SIGNATURE WINDOWS 10 64BIT

How to Disable Driver Signature Verification in Windows 10, 8.1, 8
How do I permanently disable driver signature enforcement?
In the context of uninstalling apps, permanently disabling driver signature enforcement is not a direct method for uninstalling applications. However, if you need to remove certain drivers or programs that require this action, here are the steps to do so:
1. In Windows, click the Start button and type “cmd” in the search bar.
2. Right-click on “Command Prompt” from the search results and select “Run as administrator”.
3. In the Command Prompt window, type the following command and press Enter:
“`
bcdedit /set testsigning on
“`
4. Once the command has executed successfully, you will see a message stating “The operation completed successfully.”
5. Close the Command Prompt window and restart your computer.
6. After your computer has restarted, you will notice a watermark at the bottom-right corner of your screen indicating that test mode is active.
7. With test mode enabled and driver signature enforcement disabled, you can now proceed with the removal of the specific drivers or applications as required.
Keep in mind that permanently disabling driver signature enforcement can pose security risks and potentially harm your system. Only proceed if you know what you’re doing and understand the consequences.
How to disable driver signature enforcement using cmd?
Disabling driver signature enforcement is an essential step when uninstalling certain apps that use unsigned drivers. By doing this, you can ensure a smooth uninstallation process. Here’s how to disable driver signature enforcement using Command Prompt (CMD):
Important: Disabling driver signature enforcement can compromise the security of your system. Proceed with caution and only if you understand the risks involved.
1. Restart your computer: Go to the Start menu, click on the power icon, press and hold the “Shift” key, and then click “Restart.” Your computer will boot into the advanced startup options.
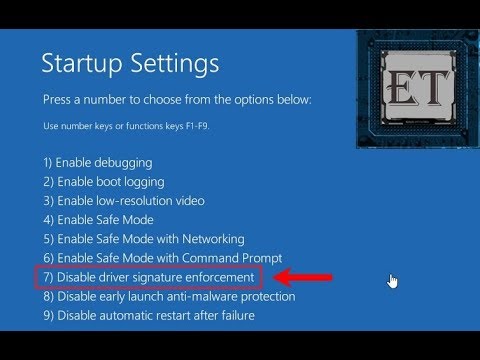
2. Open the advanced startup options: Once the advanced startup options menu opens, click on “Troubleshoot,” then “Advanced Options,” and finally “Startup Settings.”
3. Disable driver signature enforcement: On the Startup Settings screen, press the “7” or “F7” key to disable driver signature enforcement.
4. Boot into Windows: Your computer will restart and boot into Windows with driver signature enforcement disabled. Now, you can proceed with the uninstallation process for apps that require unsigned drivers.
5. Uninstall the app: With driver signature enforcement disabled, you can now uninstall the app using its provided uninstaller or through the Programs and Features panel in the Control Panel.
Remember: Keep in mind that disabling driver signature enforcement should be done only when necessary and temporarily. It can expose your system to potential security risks. To re-enable driver signature enforcement, restart your computer, and it will automatically revert to the default setting.
How do I disable driver signature enforcement in BSOD?
In the context of uninstalling apps, disabling driver signature enforcement in the Blue Screen of Death (BSOD) might be useful to remove certain drivers that may cause instability or issues. Here’s how you can disable driver signature enforcement:
Step 1: Restart your computer and enter the Advanced Startup Options. You can do this by holding the Shift key while clicking on the Restart option in the Start menu, OR by constantly pressing the F8 or F12 key during boot (depending on your computer’s manufacturer).
Step 2: Once the Advanced Startup Options menu appears, use the arrow keys to navigate and select Troubleshoot, then press Enter.
Step 3: In the Troubleshoot menu, choose Advanced Options.
Step 4: In the Advanced Options menu, select Startup Settings.
Step 5: Click on the Restart button to proceed.
Step 6: After your computer restarts, you will see a list of startup options. Press the number key (usually 7 or F7) corresponding to Disable Driver Signature Enforcement.
Your computer will start with driver signature enforcement disabled, allowing you to uninstall apps or drivers that require this level of access. Remember to re-enable driver signature enforcement after completing your tasks to ensure your system remains protected against potential threats posed by unsigned drivers.
How can I uninstall an app that requires disabling driver signature enforcement permanently in Windows 11?
To uninstall an app that requires disabling driver signature enforcement permanently in Windows 11, follow these steps:
1. Disable driver signature enforcement:
– Press Win + X and choose Windows PowerShell (Admin) from the menu.
– Type bcdedit.exe /set nointegritychecks on and press Enter.
– Restart your computer to apply the changes.
Note: Disabling driver signature enforcement can pose security risks and make your system vulnerable. It’s recommended to re-enable it after uninstalling the app.
2. Uninstall the app:
– Press Win + I to open the Settings app.
– Click on Apps, then Apps & features.
– Find the app you want to uninstall, click the ellipsis (…) next to it, and select Uninstall.
– Follow the on-screen prompts to completely remove the app.
3. Re-enable driver signature enforcement:
– Press Win + X and choose Windows PowerShell (Admin) from the menu.
– Type bcdedit.exe /set nointegritychecks off and press Enter.
– Restart your computer to apply the changes.
Now you have successfully uninstalled an app that required disabling driver signature enforcement permanently in Windows 11. Remember to keep your system secure by re-enabling driver signature enforcement after the process.
What steps should I take to safely uninstall an app after permanently disabling driver signature enforcement in Windows 11?
To safely uninstall an app after permanently disabling driver signature enforcement in Windows 11, follow these steps:
1. Backup your important files: Before uninstalling any app, it is a good practice to make a backup of your important files and data. This will ensure that you can recover them if anything goes wrong during the uninstallation process.
2. Close the app: Ensure that the app you want to uninstall is not running. Close it completely before proceeding.
3. Open Settings: Click on the Start button and then click on the Settings icon (gear icon) to open the Windows 11 Settings app.
4. Navigate to Apps: In the Settings app, click on the “Apps” section on the left side.
5. Apps & features: Under the Apps section, click on “Apps & features” to see the list of installed apps on your system.
6. Find the app in the list: Scroll through the list and locate the app you want to uninstall. Click on the app to reveal its options.
7. Click on Uninstall: Once you’ve clicked on the app, you’ll see the “Uninstall” button. Click on this button to begin the uninstallation process.
8. Follow the prompts: The uninstaller will guide you through the uninstallation process. Follow the on-screen prompts and instructions to complete the removal of the app.
9. Restart your computer: After the uninstallation is complete, it’s recommended that you restart your computer to ensure all changes are applied and the app is removed entirely.
10. Verify the app is uninstalled: Once your computer has restarted, verify that the app is no longer present on your system. You can do this by checking the “Apps & features” section in the Settings app, or by searching for the app using the Start menu.
Remember to always backup your data and perform regular system maintenance to ensure that your computer runs smoothly and securely.
Can permanently disabling driver signature enforcement in Windows 11 lead to difficulties when uninstalling certain apps?
Permanently disabling driver signature enforcement in Windows 11 can potentially lead to difficulties when uninstalling certain apps. Driver signature enforcement is a security feature that ensures only verified and signed drivers are installed on the system, preventing the installation of malicious or incompatible drivers.
Disabling this feature may allow the installation of unsigned drivers, which can cause system instability and conflicts with other installed software. Consequently, this can make it difficult to uninstall certain apps, since they may rely on those drivers for proper functioning.
It is recommended to keep driver signature enforcement enabled whenever possible to maintain system security and stability. If you need to install an unsigned driver, consider using the temporary disable option instead of permanently disabling this important security feature.