In web development, it’s vital to have the right programming language set as your default. Today we’re discussing how to set the ea-php74 package as the default PHP language. With this knowledge, you can ensure your website runs smoothly and efficiently. Let’s dive in!
Configuring the use of ea-php74 as the Default Programming Language on htaccess for Web Development
To configure the use of ea-php74 as the default programming language on htaccess file for web development, you can use the following code:
# Use ea-php74 as the default PHP version

AddHandler application/x-httpd-ea-php74 .php
This code tells the server to use ea-php74 as the handler for PHP files. You can replace “ea-php74” with any other PHP version that is available on your server.
It is important to note that this code should be added to the .htaccess file in the root directory of your website. If you have multiple websites hosted on the same server, you may need to add this code to each website’s .htaccess file.
By using this code, you can ensure that your website uses the latest version of PHP and takes advantage of its performance improvements and security features.
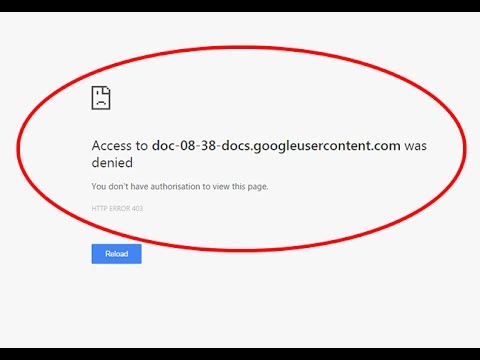
How to fix You don’t have authorisation to view this page|HTTP ERROR 403
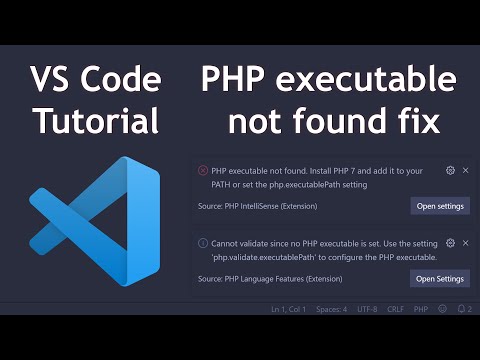
VS Code: How to fix PHP executable not found error 2020 | How to fix no PHP executable set
What is the process of installing PHP 7.4 on cPanel?
Installing PHP 7.4 on cPanel:
1. Log in to your cPanel account and navigate to the “Software” section.
2. Click on “Select PHP Version”.
3. Click on “Switch to PHP Options”.
4. Select PHP 7.4 from the drop-down menu.
5. Make any necessary changes to the PHP settings.
6. Click on “Save”.
7. You may need to restart your web server for the changes to take effect.
Updating .htaccess file:
After installing PHP 7.4, you can update your .htaccess file to ensure that your website is using the correct version of PHP. Add the following line of code to your .htaccess file:
“`
AddHandler application/x-httpd-php74 .php
“`
This tells your web server to use PHP 7.4 for all .php files on your website. If you have any other custom PHP settings in your .htaccess file, make sure they are compatible with PHP 7.4.
What is the process to change PHP version on GoDaddy?
To change the PHP version on GoDaddy, follow these steps:
1. Log in to your GoDaddy account.
2. Navigate to the hosting dashboard for the website you want to change the PHP version.
3. Click on “Settings” and scroll down to “PHP Version”.
4. Select the desired PHP version from the drop-down menu.
5. Save the changes.
Note: To ensure that the changes take effect, it is recommended to add the following code to the top of the .htaccess file:
“`
# Use PHP 7.4
AddHandler application/x-httpd-php74 .php
“`
This will tell the server to use PHP version 7.4 for the website.
How can you update your PHP version?
To update your PHP version through the .htaccess file, you need to have access to an Apache server and the ability to modify the .htaccess file. You can generally find the .htaccess file in the root directory of your web application.
Step 1: Check your current PHP version by creating a PHP info file with the following code:
“`php
“`
Save this file as `phpinfo.php` and upload it to your website. Visit this file in your browser and look for the PHP version information.
Step 2: Once you know your current PHP version, you can upgrade to a newer version if necessary. First, check if the new version is available on your server. You can do this by running the following command in your terminal:
“`bash
sudo apt-cache search php | grep [version number]
“`
Replace `[version number]` with the desired PHP version, such as 7.4 or 8.0.
Step 3: If the new PHP version is available, you can switch to it by adding the following code to your .htaccess file:
“`apacheconf
# Use PHP 7.4
AddHandler application/x-httpd-php74 .php
“`
Replace `7.4` with the desired PHP version. Save the file and upload it to your web application’s root directory.
Step 4: Test your web application to make sure everything is working correctly with the new PHP version.
That’s it! You have successfully updated your PHP version through the .htaccess file.
How can I change the PHP version on Windows?
To change the PHP version on Windows using htaccess file, follow these steps:
1. Open your website’s root directory and create or edit the .htaccess file.
2. Add the following line to the top of your .htaccess file:
AddHandler application/x-httpd-php5 .php
This line will change the PHP handler to version 5. If you want to change to a different version, replace 5 with the desired version number.
3. Save the .htaccess file and upload it to your website’s root directory.
4. Test your website to make sure that the PHP version has been changed successfully.
Note: This method works only if you have multiple PHP versions installed on your computer and you have set up your environment variables correctly. If you don’t have multiple PHP versions installed, this method won’t work and you’ll need to install the desired version first.
How can I configure my htaccess file to set the “ea-php74” package as the default PHP programming language for my website?
To configure your htaccess file to set the “ea-php74” package as the default PHP programming language for your website, you can use the following code:
AddHandler application/x-httpd-ea-php74 .php
This line of code should be added to your .htaccess file in the root directory of your website. It tells Apache to use the “ea-php74” package to handle all PHP files within your site.
Make sure that “ea-php74” package is installed on your server and that your hosting provider supports it. You can verify this by checking your server’s PHP version using the phpinfo() function.
Once you’ve updated your htaccess file, all PHP files within your website will automatically be processed using the “ea-php74” package, improve performance, security and compatibility with new versions of PHP.
Are there any specific commands or directives that I need to add to my htaccess file in order to declare “ea-php74” as the default PHP version?
Yes, you can add the following command to your .htaccess file to declare “ea-php74” as the default PHP version:
AddHandler application/x-httpd-ea-php74 .php
This tells Apache to use the “ea-php74” handler for all PHP files in the directory and its subdirectories. Make sure that you have the “ea-php74” module installed on your server before adding this directive.
What are some common issues that I may encounter when trying to set “ea-php74” as the default PHP version using my htaccess file, and how can I resolve them?
When trying to set “ea-php74” as the default PHP version using an htaccess file, you may encounter some common issues such as:
1. “500 Internal Server Error”: This error may occur when there is a syntax error in the htaccess file. To resolve this issue, make sure that the code used to set the default PHP version is correct and properly formatted.
2. PHP scripts not executing with the correct version: This can happen if the server configuration does not allow the use of custom PHP versions through htaccess. You can try contacting your hosting provider to enable this feature or switch to a different hosting plan that allows it.
3. “403 Forbidden” error: This error can occur when the server has server-level restrictions that prevent the use of custom PHP versions through htaccess. To resolve this issue, you can try adding the following code to your htaccess file:
Options +ExecCGI

AddHandler cgi-script .php

SetHandler fcgid-script

FcgidWrapper /usr/local/cpanel/cgi-sys/ea-php74
This code will allow the server to execute PHP scripts with the “ea-php74” version.
4. Compatibility issues with third-party software: When switching to a new PHP version, some third-party software may not work properly. To avoid this, always test your website thoroughly after making any changes to your htaccess file.
In conclusion, it’s important to troubleshoot any issues that may arise when setting “ea-php74” as the default PHP version using an htaccess file. If you continue to experience issues, don’t hesitate to seek help from your hosting provider or a web development expert.
In conclusion, setting the ea-php74 package as the default php programming language in the htaccess file can greatly improve the performance and stability of your website. By configuring the server to use the latest version of PHP, you can take advantage of its advanced features and security enhancements. Additionally, modifying the htaccess file allows for easy customization of your website’s functionality without needing to access the server settings directly. With this simple change, you can optimize your website for better performance and enhanced user experience.
