
Introduction: The Connection Between Mathematics and Printers
Imagine walking into a room where George Boole, the father of Boolean Algebra, is struggling to connect his laptop to a printer. Ironic, isn’t it? After all, those binary values that he formulated are the backbone of how computers, printers, and software communicate in today’s digital age. So, if you’ve ever wondered, “how to download a printer to my laptop“, you’re not alone, and it’s not as complex as you might think.
Understanding the Basics
Before we delve into the nitty-gritty, let’s clear up a common misconception. You don’t really “download” a printer. In reality, what you’re doing is installing printer drivers. Think of these drivers as a translator facilitating a conversation between your laptop and the printer. Without this software intermediary, they can’t understand each other’s language.
Why Do You Need Printer Drivers?
Printer drivers play a vital role in the printing process. The main function of a printer driver is to translate the print data output from your applications (like Word or Adobe Reader) into a language that the printer understands, ensuring the final printout looks just like it does on your screen.
How to Download a Printer to My Laptop: A Step-by-Step Guide
1. Identify Your Printer Model: Before you can install the correct drivers, you need to know exactly what type of printer you have. Search for your model on the printer itself or in the manual.
2. Find the Necessary Drivers: Go to the official website of the printer’s manufacturer. Most companies, like HP, Canon, or Epson, provide free driver downloads. Simply navigate to their support or download section, enter your printer model, and you should see an option to download the necessary drivers.
3. Download the Drivers: Click on the download link and save the file to a location on your laptop where you can easily find it later.
4. Install the Drivers: Open the downloaded file and follow the on-screen instructions to install the drivers.
5. Connect Your Printer: Finally, connect your printer to your laptop. This can be done either with a USB cable or wirelessly, depending on the printer model. Once connected, your computer should recognize the printer, utilizing the newly installed drivers.
Wireless Printing: A Brief Overview
Wireless printing is a step further in the technology world. It allows you to print without physically connecting your laptop to the printer, giving you greater flexibility and convenience.
How to Set Up Wireless Printing
Setting up wireless printing involves installing the printer drivers on your laptop, just like for a wired printer. However, you’ll also need to connect your printer to your home or office Wi-Fi network.
To do this, navigate to the printer’s network settings (usually available on the printer’s control panel), select your Wi-Fi network, and enter the password. Once the printer is connected to the network, any device on the same network can print to it, provided the correct drivers are installed. This truly brings to life the concept of “how to download a printer to my laptop“!
Conclusion: Printer Connection as a Mathematical Puzzle
Just like solving a complex mathematical problem, connecting a laptop to a printer requires understanding the variables involved, identifying the right formulas (or in our case, drivers), and applying them correctly. As software engineers and mathematics enthusiasts, we thrive in such puzzles, making technology work for us. And remember, just like in mathematics, in connecting printers, practice makes perfect. Happy printing!
How To Print From A Laptop To Printer | Print Tutorial

How to Change a Printer from Offline to Online
how to print from laptop or computer to printer easily
How do I get my laptop to recognize my printer?
To get your laptop to recognize your printer, follow these steps:
1. Ensure Your Printer Is On: First thing to do is to ensure that the printer is powered on and in a ready state.
2. Connect Your Printer: Connect your printer to your laptop via USB or through a network. If it’s a network printer, ensure both devices are connected to the same network.
3. Install Printer Drivers: Your laptop may not be recognizing the printer if it lacks the necessary drivers. Visit your printer manufacturer’s website and find the appropriate driver for your printer model. Download and install it.
4. Check Printer Settings: Go to ‘Devices and Printers’ on your laptop (you can search for this in the Start menu), then select ‘Add a Printer’. If it’s plugged in via USB, it should appear here. If it’s a network printer, click on ‘Add a network, wireless or Bluetooth printer’ and your laptop will search for available printers.
5. Set as Default: Once your printer appears, you may need to set it as your default printer. You can do this by right-clicking the printer and selecting ‘Set as default printer’.
If your printer still isn’t recognized by your laptop, try troubleshooting the issue by checking your connection, restarting both devices, or contacting tech support.
How do I download and install a printer?
Step 1: Select the appropriate software.
On your computer, ensure you have the correct drivers to facilitate communication between your printer and your PC. Manufacturers often provide these on their website. Search for your printer model followed by “driver”, download and save the file.
Step 2: Install the printer driver.
Find where you downloaded the driver file on your computer and double click to begin installation. An installation wizard should start guiding you through the process. You will most likely be asked to agree to the terms and conditions before the installation begins.
Step 3: Connect the printer.
Connect your printer to the computer using the appropriate cables (usually USB). You could also make use of Wi-Fi connections if your printer supports that.
Step 4: Set up the printer on your PC.
Go to ‘devices and printers’ in your computer’s control panel, select ‘add a printer’ and follow the instructions. If the printer is ready to be added, it should appear in the list of printers. Click on it and follow the instructions. You may need to restart your PC.
Step 5: Test the printer.
Finally, once the software has been installed and the printer identified by your PC, you could print a test page or document to ensure the printer is working correctly. If the test page prints successfully, it indicates that the printer has been installed properly.
Keep in mind that the steps may vary slightly depending on your operating system and the printer model. If you are having difficulties, refer to the printer’s manual or support pages of the manufacturer’s website for specific instructions.
How do I manually add a printer?
Manually adding a printer to your computer can be done in a few steps. Here’s a simple guide to help you through the process, assuming you’re using a Windows operating system:
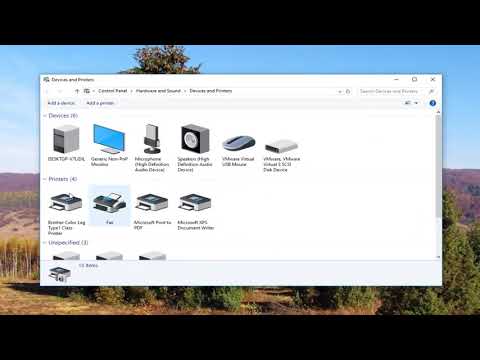
1. Open Control Panel
Go to Start, type in ‘Control Panel’ and select it from the results.
2. Navigate to Devices and Printers
Once in control panel, click on ‘Hardware and Sound’, then select ‘Devices and Printers’.
3. Add a Printer
In the devices and printers window, click on ‘Add a Printer’ at the top of the screen.
4. Select your Printer
A new window will appear showing available printers. If your printer is not there, select ‘The printer that I want isn’t listed’.
5. Choose Printer by name or TCP/IP Address
You’ll have options to add a printer by name or TCP/IP address. Choose the option that suits your situation.
6. Follow the On-screen Instructions
From here, the wizard should guide you through the rest of the setup, which includes installing the necessary drivers. Make sure to have any usernames or passwords associated with the printer nearby.
Remember to always check your printer’s manual or manufacturer’s website for specific installation instructions as these can vary based on the printer model and your operating system version.
Finally, test the printer to ensure it’s working correctly.
“What are the steps to download a printer driver for my laptop?”
Sure, here are the steps to download a printer driver for your laptop:
1. Identify your printer model: You can usually find this information on the front of your printer or in the manual that came with it.
2. Visit the manufacturer’s website: Most major printer manufacturers have a “Support” or “Downloads” section on their websites where you can find drivers.
3. Enter your printer model: Once you’re in the appropriate section of the website, you’ll need to enter your printer model into a search bar or select it from a list.
4. Select the correct driver: The website should then display a list of available drivers for your printer model. Make sure to choose the driver that matches your operating system (e.g., Windows 10, macOS Big Sur).
5. Download the driver: After selecting the correct driver, click on the download link or button to start the download process.
6. Install the driver: Once the driver is downloaded, locate the file on your laptop and double-click on it to start the installation process. Follow the prompts to install the driver.
7. Restart your laptop: After installing the driver, it’s a good idea to restart your laptop to ensure the changes take effect.
8. Check the printer: Finally, try printing something to confirm that the driver was installed correctly.
Remember, in some cases, you might need to update your printer driver if it’s out of date or not working properly. This process is usually similar to downloading a new driver.
“Which is the safest website to download printer software for my laptop?”
The safest website to download printer software for your laptop would be the official manufacturer’s website. Every brand usually has a dedicated support section on their website where you can find the latest software and drivers for their printers. This ensures that you are downloading the most up-to-date and compatible software for your specific printer model, which is vital for its optimal functioning. Always avoid unofficial sources to prevent potential security risks.
“How can I ensure the compatibility of the downloaded printer software with my laptop?”
Ensuring the compatibility of the downloaded printer software with your laptop involves taking certain steps.
1. Check your Laptop’s Operating System (OS): The first step is to identify the operating system installed on your laptop. Printers usually have specific software for each type of operating system, be it Windows, macOS, or Linux.
2. Determine the Printer’s Model: Knowing the particular model of your printer is paramount. This information helps you search for the correct software or driver.
3. Visit the Manufacturer’s Website: Once you have this information, visit the printer manufacturer’s website. They typically have a support or download section where you can find the appropriate software.
4. Select the Appropriate Software: Find the software that matches both your printer model and your laptop’s operating system. Compatibility usually means an exact match here.
5. Download and Install: Download the software and follow the instructions provided for installation. Usually, these processes are straightforward once the right software is selected.
6. Test for Compatibility: After installation, print a test page to verify if the software is compatible with your laptop. If the process fails, you may need to contact customer support for assistance.
Remember, using incompatible software could lead to poor performance or even damage to your laptop or printer. Therefore, always ensure that both the printer software and laptop’s OS are compatible before proceeding with the installation.
“What are the common issues one might face while downloading a printer to a laptop and how can they be resolved?”
There are several issues that one might encounter while downloading a printer to a laptop, with solutions varying based on the source of the problem. Some common issues include:
1. Compatibility Issues: The printer’s software or drivers may not be compatible with your laptop’s operating system. For resolving this issue, always ensure you download the drivers specific to your operating system and its version. You can usually find this information on the printer manufacturer’s website.
2. Incorrect Printer Driver: Downloading the wrong printer driver is a common mistake. To remedy this, double-check the model number of the printer and then re-download the appropriate driver. Again, the printer manufacturer’s website will be the best source for this.
3. Outdated Printer Driver: If your printer’s driver is outdated, it may not function correctly with your laptop. Manufacturers often release updates for their drivers which can fix bugs and improve performance. Visit the manufacturer’s website, find your printer model, and check if any updated drivers are available.
4. Corrupt Download: The printer driver download might become corrupt due to network interruptions or other technical issues. If you suspect this might be the case, try to re-download the files.
5. Firewall or Antivirus Interference: Sometimes your computer’s firewall or installed antivirus software can block the installation of new drivers. You can temporarily disable these programs while you install the printer driver and then enable them again after installation is complete.
6. USB Connection Issues: If you’re using a USB-printer connection, issues could stem from the cable or the USB port itself. Try using a different USB port or a different cable to see if this resolves the issue.
Remember, it’s crucial to go to the official manufacturer’s website to download your printer’s drivers. This ensures compatibility and safety, preventing potential malware that could come from third-party sites.
“How can I optimize the performance of my laptop after downloading a printer?”
After downloading a printer software on your laptop, you may experience some changes in performance. To optimize the performance of your laptop after this, follow the steps below:
1. Update Your Laptop’s Operating System: Always ensure your operating system (OS) is up-to-date. This makes sure you have the latest bug fixes, security updates, and improved system stability.
2. Update Your Printer Software: Make sure you’re using the latest version of your printer software. Manufacturers often release updates to fix bugs and improve performance.
3. Delete Unnecessary Files: After installing your printer, you might have temporary files or old installation files left on your system. Using a system cleaner utility can help remove these and free up space for your computer to run more efficiently.
4. Optimize Your Startup: Some printer software adds a startup task to automatically start the program when you boot up your laptop. Too many startup tasks can slow down your laptop, so check what programs are set to run at startup and disable any unnecessary ones.
5. Check For Conflicting Software: Sometimes, other software installed on your laptop can conflict with your printer software. Run a system diagnostic if you notice significant changes in performance after installing the printer software to identify potential conflicts.
6. Reinstall The Printer Software: If all else fails, try uninstalling and reinstalling the printer software. There might have been an issue during the initial installation that’s affecting your laptop’s performance.
By applying these tips, you can maintain optimal performance on your laptop after installing a new piece of software such as a printer driver.


