
Have you ever encountered a critical situation in which you needed to access your Cisco switch remotely, but the only available option was Telnet? Those moments of frustration can be left behind if you know *how to enable SSH on Cisco Switch 2960 X*. By implementing this industry-standard protocol, you’ll significantly improve the security of your network management connections. But how do you go about it? Keep reading to unravel the mystery.
Why You Should Upgrade to SSH
Before diving into the configuration steps, let’s briefly discuss the importance of upgrading from Telnet to SSH. The Secure Shell (SSH) protocol offers a more secure environment for managing and configuring your devices due to its encrypted nature. By contrast, Telnet sends data in plaintext, making it highly susceptible to eavesdropping and interception.
With an increasing number of cyber threats lurking around every corner, it’s crucial to protect your network infrastructure by implementing robust security measures such as SSH. Now, let’s explore the process of enabling SSH on a Cisco 2960 X Series switch.
Prerequisites for Enabling SSH
Before starting the actual configuration, ensure the following prerequisites are met:
1. Cisco IOS version: Confirm that your Cisco switch is running an IOS version that supports cryptographic features. You can check this by executing the command `show version` and looking for the “K9” designation.
2. Generated RSA keypair: To use SSH, you’ll need to generate a cryptographic keypair. We’ll explain this step further in the configuration process.
3. Local user account: It’s essential to create a local user account with the appropriate privileges to log in using SSH.
Step-by-Step Guide: How to Enable SSH on Cisco Switch 2960 X
#
Step 1: Configure Basic Settings
Start by configuring the basic settings on the switch. Assign a hostname, domain name, and set the clock. You can use the following commands as a guide:
“`
Switch> enable
Switch# configure terminal
Switch(config)# hostname MySwitch
MySwitch(config)# ip domain-name mydomain.com
MySwitch(config)# clock set 12:00:00 1 April 2022
“`
Replace “MySwitch” with your desired hostname and “mydomain.com” with your domain name.
#
Step 2: Configure User Authentication
Next, configure the local user account with the necessary privileges for SSH access. Use the following commands:
“`
MySwitch(config)# username myuser privilege 15 secret mypassword
“`
Replace “myuser” and “mypassword” with your desired username and password, respectively.
#
Step 3: Generate RSA Keys
Now it’s time to generate the RSA keypair required for SSH. Execute the following commands:
“`
MySwitch(config)# crypto key generate rsa general-keys modulus 2048
“`
The “modulus 2048” parameter indicates the length of the RSA key. You can choose other values, but 2048 bits are recommended for enhanced security.
#
Step 4: Enable SSH Version 2
To enable SSH version 2 (which is recommended for improved security), use the following command:
“`
MySwitch(config)# ip ssh version 2
“`
#
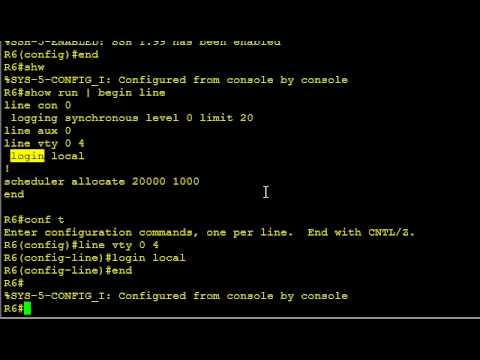
Step 5: Configure SSH Access on VTY Lines
Lastly, configure the switch’s VTY lines to support the SSH protocol for remote access. Run the following commands:
“`
MySwitch(config)# line vty 0 15
MySwitch(config-line)# transport input ssh
MySwitch(config-line)# login local
MySwitch(config-line)# exit
“`
This configuration ensures all VTY lines will only accept SSH connections and authenticate using the local user database.
#
Step 6: Save Your Configuration
Make sure to save your configuration to ensure it persists across reboots:
“`
MySwitch# write memory
“`
Testing Your SSH Connection
With SSH enabled on the Cisco switch, you can now test the connection using an SSH client like PuTTY or OpenSSH. Use the following command syntax as an example:
“`
ssh -l myuser 192.168.1.1
“`
Replace “myuser” with your username and “192.168.1.1” with your switch’s IP address.
Congratulations! You’ve successfully enabled SSH on your Cisco 2960 X Series switch. By embracing this secure protocol, you’re taking a crucial step in safeguarding your network management connections from potential threats. Now you can manage your switch remotely with confidence, knowing that your data is protected by robust encryption.
How To Configure CISCO Switches ( Step By Step )

1.3.6 Packet Tracer – Configure SSH (عربي)

Setup SSH on Cisco IOS
How do I configure secure shell (SSH) access on a Cisco 2960-X switch for secure remote management?
To configure Secure Shell (SSH) access on a Cisco 2960-X switch for secure remote management, follow these steps:
1. Configure Hostname and Domain Name: Set the hostname and the domain name for the switch using the following commands:
“`
Switch(config)# hostname
Switch(config)# ip domain-name
“`
2. Generate RSA Key Pair: Generate an RSA key pair for SSH authentication using the following command:
“`
Switch(config)# crypto key generate rsa modulus
“`
Replace “ with the desired key length, typically 1024 or 2048 bits.
3. Enable SSH Transport: Enable SSH as the transport input method for management access using these commands:
“`
Switch(config)# line vty 0 15
Switch(config-line)# transport input ssh
Switch(config-line)# exec-timeout
“`
Replace “ and “ with the desired timeout values for SSH sessions.
4. Create Local User Account: Create a local user account with privileged access to enable SSH login using the following command:
“`
Switch(config)# username privilege 15 secret
“`
Replace “ and “ with the desired user credentials.
5. Enable AAA Authentication: Configure the switch to use the local user database for authentication by executing the following command:
“`
Switch(config)# aaa new-model
Switch(config)# aaa authentication login default local
“`
6. Save Configuration: Save the changes on the switch by running the following command:
“`
Switch# write memory
“`
Once all these steps are completed, you will have successfully configured SSH access on your Cisco 2960-X switch for secure remote management.
What are the necessary steps to generate RSA key pairs and enable SSH version 2 on my Cisco 2960-X switch?
To generate RSA key pairs and enable SSH version 2 on your Cisco 2960-X switch, follow these necessary steps:
1. Access the switch: First, you need to connect to your Cisco switch using a console cable and terminal emulation software (e.g., PuTTY).
2. Enter privileged EXEC mode: After connecting to the switch, enter the command enable to enter privileged EXEC mode. You might be prompted for a password if one is configured.
3. Enter global configuration mode: Enter the command configure terminal or conf t for short to enter global configuration mode.
4. Set the hostname (optional): If you haven’t already configured a hostname for your switch, enter the command hostname [your-hostname] to set a unique hostname for your switch.
5. Configure the management interface (optional): If you haven’t set up the management IP address and default gateway of your switch, you should do that now. To configure an IP address, use the command interface vlan1, then ip address [your-ip-address] [subnet-mask]. To configure the default gateway, use the command ip default-gateway [gateway-ip-address].
6. Enable SSH: Enter the command ip ssh version 2 to enable SSH version 2 on your switch.
7. Generate RSA key pairs: Enter the command crypto key generate rsa to generate the RSA key pairs. The system will prompt you to choose a modulus length (the number of bits in the encryption key). Choose a modulus length between 1024 and 2048 bits for better security, such as 1024.
8. Configure user authentication: Configure the local user database for SSH access by entering the command username [your-username] privilege 15 secret [your-password]. This creates a user with administrative privileges and an encrypted password.
9. Configure the VTY lines: Configure the VTY lines to use the local user database and allow only SSH access. Enter the commands line vty 0 15 followed by login local and transport input ssh.
10. Save your configuration: Lastly, don’t forget to save your configuration using the command copy running-config startup-config or write memory for short.
Now you have successfully generated RSA key pairs and enabled SSH version 2 on your Cisco 2960-X switch.
Can you provide a detailed guide on setting up user authentication and authorization for SSH connections on a Cisco switch 2960-X?
Setting up User Authentication and Authorization for SSH Connections on a Cisco Switch 2960-X
This guide provides a detailed overview of setting up user authentication and authorization for SSH connections on a Cisco switch 2960-X. By following these steps, you can improve your network security and control access to your switch.
Step 1: Enable SSH
First, you need to enable SSH on the Cisco switch 2960-X. To do this, enter the following commands:
“`
Switch>enable
Switch#configure terminal
Switch(config)#ip domain-name
Switch(config)#crypto key generate rsa
Switch(config)#ip ssh version 2
Switch(config)#end
“`
Step 2: Configure User Authentication
Once SSH is enabled, configure user authentication using one of the following methods:
– Local device authentication:
“`
Switch>enable
Switch#configure terminal
Switch(config)#username secret
Switch(config)#line vty 0 15
Switch(config-line)#login local
Switch(config-line)#transport input ssh
Switch(config-line)#exit
Switch(config)#end
“`
– Remote AAA server (RADIUS or TACACS+):
“`
Switch>enable
Switch#configure terminal
// RADIUS Server
Switch(config)#aaa new-model
Switch(config)#radius-server host key
// Or TACACS+ Server
Switch(config)#tacacs-server host key
Switch(config)#aaa group server
Switch(config-sg)#server
Switch(config)#aaa authentication login default group local
Switch(config)#line vty 0 15
Switch(config-line)#login authentication default
Switch(config-line)#transport input ssh
Switch(config-line)#exit
Switch(config)#end
“`
Step 3: Configure User Authorization
– Local device authorization:
“`
Switch>enable
Switch#configure terminal
Switch(config)#privilege exec level 15
Switch(config)#username privilege 15 secret
Switch(config)#end
“`
– Remote AAA server (RADIUS or TACACS+):
“`
Switch>enable
Switch#configure terminal
// RADIUS Server
Switch(config)#radius-server vsa send authentication
Switch(config)#radius-server attribute 6 on-for-login-auth
// Or TACACS+ Server
Switch(config)#aaa authorization exec default group if-authenticated
Switch(config)#end
“`
By following these steps, you will have set up user authentication and authorization for SSH connections on your Cisco switch 2960-X. Make sure to replace the placeholders with your specific information.
Are there any best practices for securing SSH access to a Cisco 2960-X switch, such as disabling Telnet or using ACLs?
Yes, there are several best practices for securing SSH access to a Cisco 2960-X switch. Here are some recommendations:
1. Disable Telnet: One of the essential steps in securing your switch is disabling Telnet and only using SSH for remote access as SSH is encrypted, while Telnet is not.
2. Configure Access Control Lists (ACLs): Implement ACLs to restrict which IP addresses or subnets can access the switch. This reduces the risk of unauthorized access.
3. Use Strong Authentication: Instead of relying on simple password-based authentication, use public key-based authentication for stronger security. Additionally, enforce a strong passphrase policy for users who need to authenticate via passwords.
4. Update to the Latest SSH Version: Ensure you’re running the latest available SSH version (preferably SSHv2) on your Cisco 2960-X switch. Older versions may have vulnerabilities that could be exploited.
5. Enable SSH Timeout and Retry Settings: Configure the switch to automatically disconnect inactive SSH sessions after a specified time and limit the number of failed login attempts to protect against brute force attacks.
6. Restrict User Privileges: Limit user access rights by assigning appropriate privilege levels to different users. Avoid giving excessive privileges to general users and reserve higher privilege levels for administrators.
7. Monitor and Log SSH Connections: Regularly check logs to monitor all SSH connections and activities. It helps identify any suspicious activity or unauthorized access attempts.
By implementing these best practices, you can significantly improve the security of SSH access to your Cisco 2960-X switch.
How can I troubleshoot common issues related to enabling SSH on a Cisco 2960-X switch, such as connection failures or authentication problems?
When troubleshooting common issues related to enabling SSH on a Cisco 2960-X switch, such as connection failures or authentication problems, you can follow these steps:
1. Verify device configuration: Ensure that the switch is properly configured for SSH access. This includes checking for the correct IOS image, generating a cryptographic key pair, and setting up user credentials with the necessary privilege levels.
2. Check SSH version: Make sure that the SSH version running on the switch is compatible with the client attempting to connect. Cisco switches support both SSHv1 and SSHv2. You can check the SSH version using the command: show ip ssh
3. Inspect access list restrictions: Verify if any access list (ACL) or firewall rules are limiting incoming SSH connections to the switch. If the switch has an ACL applied, ensure that it doesn’t block the client’s IP address.
4. Confirm login credentials: Ensure that the correct username and password are being used to authenticate. Verify if the local database or external servers (such as TACACS+ or RADIUS) are correctly configured for user authentication.
5. Examine transport input settings: Check the switch’s VTY lines configuration to confirm that the “transport input” setting allows SSH connections. You can do this by using the command: show run | section line vty
6. Test connectivity: Using a tool like PuTTY or OpenSSH, attempt to connect to the Cisco switch via SSH. If the connection fails, check the error message for more information about the issue.
7. Review switch logs: Inspect the switch’s log messages for any errors or warnings related to SSH access. Use the command: show logging to view the log messages.
8. Update IOS image (if necessary): If the switch is running an older IOS version that doesn’t fully support SSH, consider upgrading to a newer version. Check Cisco’s website for IOS updates and compatibility with your specific hardware model.
Following these steps should help you identify common issues relating to enabling SSH on a Cisco 2960-X switch, and allow you to resolve them accordingly.
