
Introduction: The World of Secure Shell in Cisco Switches
Imagine a world where you have full control over your network devices, managing them securely and efficiently. This world exists, and it’s all thanks to a protocol called Secure Shell (SSH). SSH provides a safe way to access and manage devices like the Cisco Switch 2960 X, making life easier for network administrators. But how do you configure SSH on a Cisco Switch 2960 X? That’s what this comprehensive guide is all about. So, buckle up and get ready for a deep dive into the world of SSH configuration.
How to Configure SSH on Cisco Switch 2960 X: The Steps You Need to Know
Before diving into configuring SSH on your Cisco Switch 2960 X, it’s crucial to understand the prerequisites and steps involved in the process. The configuration process can be broken down into the following stages:
1. Initial Configuration
2. Configure Cryptographic Keys
3. Configure SSH Access
4. Verify SSH Configuration
Initial Configuration
To get started with configuring SSH on your Cisco Switch 2960 X, follow these initial steps:
1. Connect to your Cisco Switch 2960 X via the console port using a terminal emulation program (e.g., HyperTerminal or PuTTY).
2. Enter privileged EXEC mode by typing `enable` and providing the necessary password.
3. Enter global configuration mode by typing `configure terminal`.
At this stage, you should also set the hostname, domain name, and user credentials for the switch. Here’s an example of how to perform this initial setup:
“`
Switch> enable
Switch# configure terminal
Switch(config)# hostname MySwitch
MySwitch(config)# ip domain-name mydomain.local
MySwitch(config)# username admin privilege 15 secret mypassword
“`
Configure Cryptographic Keys
After completing the initial configuration, the next step is to generate a public-private key pair using the *RSA* (Rivest-Shamir-Adleman) algorithm. This key pair is used for SSH authentication and encryption purposes. Follow these steps to generate the cryptographic keys:
1. Enter global configuration mode by typing `configure terminal` (if you’re not already in this mode).
2. Generate the RSA key pair by typing `crypto key generate rsa`. You’ll be prompted to provide a key length. It’s recommended to use a value of at least 1024 bits for improved security.
Here’s an example of generating a 2048-bit RSA key pair:
“`
MySwitch(config)# crypto key generate rsa
How many bits in the modulus [512]: 2048
% Generating 2048 bit RSA keys, keys will be non-exportable…
[OK] (elapsed time was 2 seconds)
“`
Configure SSH Access
With the cryptographic keys generated, it’s time to configure SSH access on the Cisco Switch 2960 X. Here are the necessary steps:
1. Enable the SSH server by typing `ip ssh version 2` in global configuration mode. This command sets the switch to use SSH protocol version 2, which provides improved security over version 1.
2. Configure the switch to accept only SSH connections for remote management by typing `line vty 0 15` and then `transport input ssh`.
Here’s an example of these configurations:
“`
MySwitch(config)# ip ssh version 2
MySwitch(config)# line vty 0 15
MySwitch(config-line)# transport input ssh
“`
Verify SSH Configuration
After completing these steps, it’s essential to verify that SSH has been correctly configured on your Cisco Switch 2960 X. You can do this by:
1. Checking the SSH server’s status using the `show ip ssh` command. This command displays information such as the SSH version, authentication timeout, and RSA key pair details.
2. Attempting an SSH connection to the switch from a workstation or another network device. You should be able to connect successfully using the credentials that you configured earlier.
Here’s an example of verifying SSH configuration:
“`
MySwitch# show ip ssh
SSH Enabled – version 2.0
Authentication timeout: 120 secs; Authentication retries: 3
Minimum expected Diffie Hellman key size : 1024 bits
“`
Conclusion: Securely Managing Your Cisco Switch 2960 X
Now that you know how to configure SSH on your Cisco Switch 2960 X, you’re well on your way to managing your network devices securely and efficiently. Remember to keep your SSH configuration up-to-date and follow best practices to maintain the highest level of network security. Enjoy the newfound control that SSH provides and happy networking!
Configure a Cisco Switch for SSH access -Part 1 setup

Connect Cisco Router and Switch to ISP Home Router and Access Internet

Setup SSH on Cisco IOS
How can one enable SSH access on a Cisco Catalyst 2960-X switch for secure remote management?
To enable SSH access on a Cisco Catalyst 2960-X switch for secure remote management, follow these steps:
1. Configure a hostname for the switch by using the following command:
“`
Switch(config)#hostname
“`
2. Configure a domain name for the switch by using the following command:
“`
(config)#ip domain-name
“`
3. Generate RSA key pairs for SSH encryption by entering the following command:
“`
(config)#crypto key generate rsa
“`
4. When prompted to choose the key size, choose a size of 1024 bits or higher for better security.
5. Enable SSH version 2 by using the following command:
“`
(config)#ip ssh version 2
“`
6. Create a local user account for authentication by entering the following command:
“`
(config)#username privilege 15 secret
“`
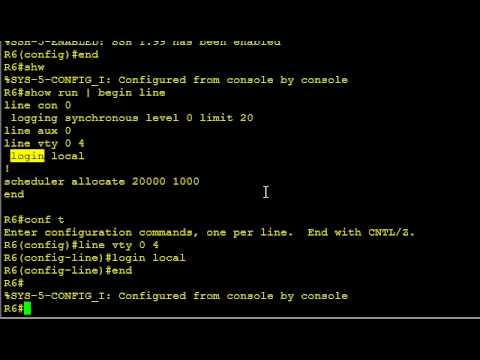
7. Configure the VTY lines to require SSH and authenticate using the local user account by entering these commands:
“`
(config)#line vty 0 15
(config-line)#transport input ssh
(config-line)#login local
(config-line)#exit
“`
8. Save the configuration to the startup-config by entering these commands:
“`
#write memory
#reload
“`
After completing these steps, you should have SSH access enabled on your Cisco Catalyst 2960-X switch for secure remote management.
What are the necessary steps to generate RSA keys for SSH configuration on a Cisco 2960-X switch?
To generate RSA keys for SSH configuration on a Cisco 2960-X switch, follow these steps:
1. Access the switch command-line interface (CLI): You can access the CLI using a console cable or a remote connection through Telnet or SSH.
2. Enter privileged EXEC mode: Type “enable” and provide the enable password to enter privileged EXEC mode. This will allow you to make changes to the switch configuration.
3. Enter global configuration mode: Type “configure terminal” to enter global configuration mode. This is where you will execute commands that apply to the entire switch.
4. Configure the hostname: If your switch does not have a configured hostname, set one using the command “hostname [your_hostname]”, replacing [your_hostname] with the desired name. For example: “hostname Switch2960X”. This step is important because the RSA key pair will be labeled with the hostname.
5. Create a domain name: Use the command “ip domain-name [your_domain_name]” to create a domain name for the switch. Replace [your_domain_name] with the desired domain name. For example: “ip domain-name mynetwork.com”.
6. Generate the RSA key pair: Type “crypto key generate rsa” to generate the RSA key pair. The switch may prompt you to confirm the action, type “yes” to proceed. You may also be prompted to choose the size of the key modulus; the recommended size is 2048 bits.
7. Enable SSH transport: By default, the switch uses Telnet for remote connections. To enable SSH, use the command “ip ssh version 2” to configure the switch to use SSHv2. Next, type “line vty 0 15” to enter line configuration mode for virtual terminal lines 0 to 15, which are used for remote connections. Then type “transport input ssh” to enable SSH transport.
8. Configure authentication: Configure a local username and password for SSH authentication using the command “username [your_username] password [your_password]” or “username [your_username] secret [your_password]” where [your_username] is the desired username and [your_password] is the desired password. The “secret” keyword stores the password securely using an encrypted format.
9. Apply the authentication method to the VTY lines: While still in line configuration mode, type “login local” to apply the local authentication method that uses the local username and password that you created earlier.
10. Save the configuration: Type “end” to return to privileged EXEC mode and use the command “write memory” or “copy running-config startup-config” to save the configuration changes.
After completing these steps, your Cisco 2960-X switch should have a working SSH configuration with RSA keys generated for secure remote access.
How does the process of setting up an IP domain-name differ when configuring SSH on Cisco 2960-X switches?
The process of setting up an IP domain-name when configuring SSH on Cisco 2960-X switches involves a few key steps. In the context of Secure Shell, it is crucial to emphasize the most important parts of the process.
1. Access the switch’s command-line interface (CLI): To configure SSH on the Cisco 2960-X switch, you need to access the CLI using a console connection or a Telnet/SSH remote connection.
2. Enter global configuration mode: Use the command `configure terminal` or `conf t` to enter the global configuration mode. This is where you will set up your IP domain-name.
3. Configure the IP domain-name: Use the command `ip domain-name ` to set up the IP domain-name for your switch. For example, you might enter `ip domain-name mycompany.com`. This is an important step since the IP domain-name is used to create the RSA key pair needed for SSH functionality.
4. Generate RSA key pair: After setting up the IP domain-name, use the command `crypto key generate rsa` to generate an RSA key pair for authentication. You will be prompted to choose the key length (recommended 2048 bits or higher).
5. Enable SSH transport input: Next, enable the SSH transport input on the virtual terminal (VTY) lines that are used for remote access. Use the command `line vty 0 15` to access the VTY lines configuration, followed by `transport input ssh` to enable SSH.
6. Create a username and password: Finally, create a local user account with a secure password to enable login via SSH. Use the command `username privilege 15 secret ` to create the required account. For example, `username myuser privilege 15 secret mypassword`.
Remember to save your changes with the `write memory` or `copy running-config startup-config` command.
In summary, setting up an IP domain-name when configuring SSH on Cisco 2960-X switches involves accessing the CLI, entering global configuration mode, configuring the IP domain-name, generating an RSA key pair, enabling SSH transport input, and creating a username and password.
What are the best practices for configuring user authentication and privilege levels for SSH connections on a Cisco switch 2960-X?
When configuring user authentication and privilege levels for SSH connections on a Cisco switch 2960-X, it is essential to follow best practices to ensure a secure and efficient setup. Here are some main points to consider:
1. Use SSHv2: Always enable SSH version 2 (SSHv2) on your Cisco switch, as it offers better security features compared to SSHv1. To do this, run the command `ip ssh version 2`.
2. Create unique usernames and passwords: Avoid using default or common login credentials. Instead, create unique usernames and passwords for each user who needs access to the switch.
3. Set strong passwords: Use strong, complex passwords that include a mix of upper and lowercase letters, numbers, and special characters. This will make it more difficult for unauthorized users to gain access to the switch.
4. Configure user privilege levels: Assign appropriate privilege levels to different users based on their job responsibilities and requirements. This ensures that users only have access to the commands and features they need, reducing the risk of accidental or intentional misconfigurations.
5. Use AAA (Authentication, Authorization, and Accounting): Configure AAA with TACACS+ or RADIUS servers for central management of user credentials and permissions. This enables you to keep track of who is accessing the switch and what actions they are performing.
6. Restrict management access: Limit the number of devices and IP addresses that can connect to the switch using SSH. This can be achieved by implementing Access Control Lists (ACLs).
7. Set idle timeouts: Configure session timeouts so that idle SSH connections are automatically terminated after a specific period of inactivity. This helps reduce the possibility of unauthorized access due to unattended SSH sessions.
8. Monitor and log SSH connections: Make use of logging features to monitor and record SSH login attempts, successful logins, and command executions. Regularly review log files to identify any suspicious activity.
9. Keep switch firmware up-to-date: Always ensure that your Cisco switch is running the latest firmware version, which includes security patches and updates.
By following these best practices, you can significantly improve the security and management of SSH connections on your Cisco 2960-X switch.
How can you properly configure an access control list (ACL) to limit SSH access to specific IP addresses on a Cisco 2960-X switch?
To properly configure an access control list (ACL) to limit SSH access to specific IP addresses on a Cisco 2960-X switch, follow these steps:
1. Create an access control list: First, you need to create an ACL containing the IP addresses that should be allowed to access the switch through SSH. Use the command ‘ip access-list extended’ followed by an ACL name or number. For example:
“`
Switch(config)# ip access-list extended ALLOW_SSH
“`
2. Specify the permitted IP addresses: Inside the ACL configuration, use the ‘permit’ command to allow specific IP addresses or subnets. You can also use the ‘deny’ command to explicitly block certain IPs if needed. For example:
“`
Switch(config-ext-nacl)# permit tcp host 192.168.1.10 eq ssh
Switch(config-ext-nacl)# permit tcp host 192.168.2.20 eq ssh
Switch(config-ext-nacl)# deny tcp any any eq ssh
Switch(config-ext-nacl)# permit ip any any
“`
This ACL allows only the hosts 192.168.1.10 and 192.168.2.20 to access the switch via SSH, while denying access from all other IP addresses.
3. Apply the ACL to the Virtual Terminal Lines (VTY): Exit the ACL configuration mode and apply the ACL to the VTY lines using the ‘access-class’ command. This will ensure that the defined rules are applied to incoming SSH connections. For example:
“`
Switch(config-ext-nacl)# exit
Switch(config)# line vty 0 15
Switch(config-line)# access-class ALLOW_SSH in
Switch(config-line)# exit
“`
4. Save the configuration: Finally, save the changes to the running configuration to make them persistent across reboots. Use the ‘write memory’ or ‘copy running-config startup-config’ command:
“`
Switch# write memory
“`
By following these steps, you can properly configure an access control list (ACL) to limit SSH access to specific IP addresses on a Cisco 2960-X switch.
